“And what is the use of a book," thought Alice, "without pictures or conversation?”
— Lewis Carroll, Alice's Adventures in Wonderland
flowmaps
A "Flow Based Programming" sequencer for Clojure with interactive flow debugger & visualizer
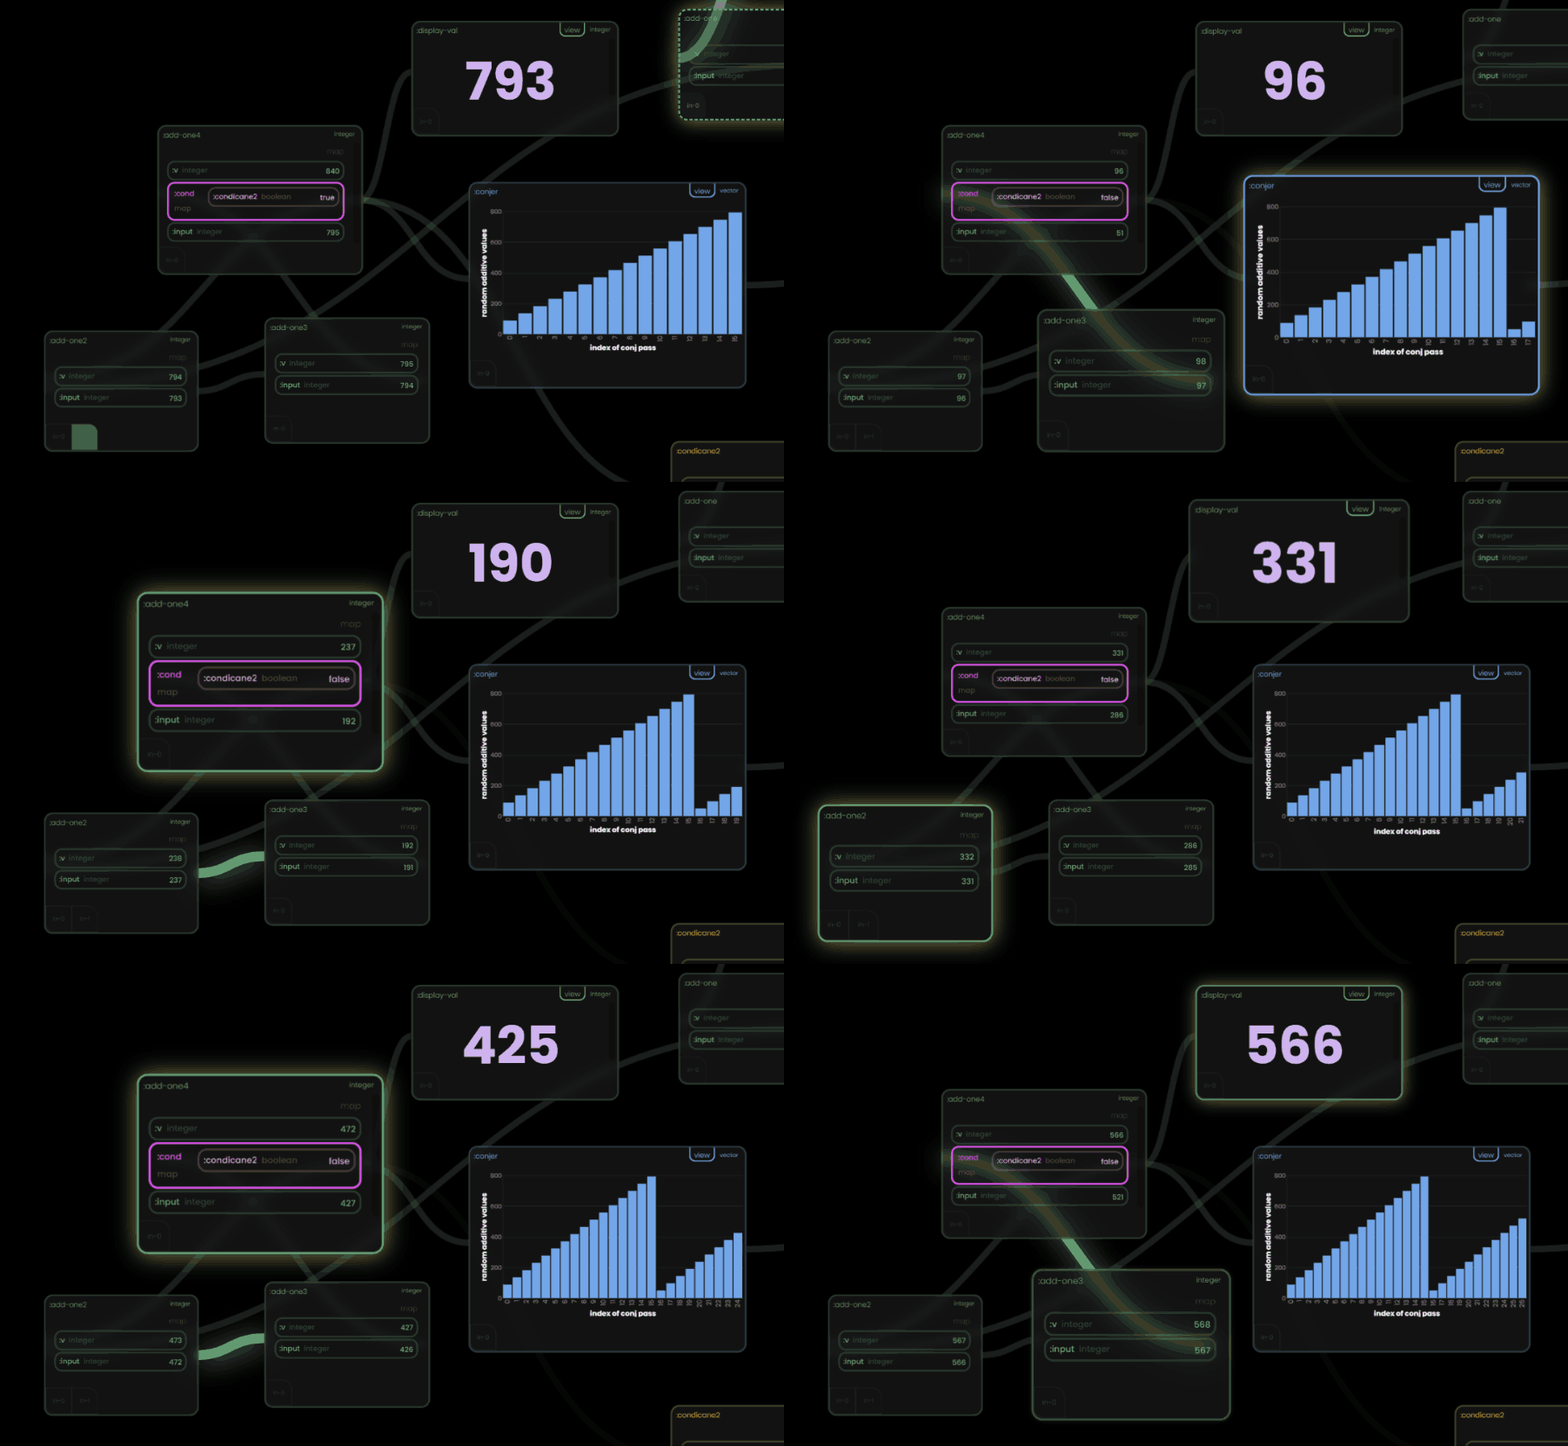
Rebooting flow-based programming in Clojure by enabling effortless orchestration of core.async pipelines & intricate application flows.
-
Craft flows in a simple bullshit-free map structure, watch them come to life in a time-traveling "Rabbit" canvas UI.
-
Debug, visualize, and experiment in real-time, helping to ensure observability and understanding anywhere you need async chains.
-
Function documentation
Flow Based Programming?
Originally introduced by J. Paul Morrison in the 1970s, FBP (Flow Based Programming) is a programming approach that defines applications as networks of "black box" processes, which exchange data packets over predefined connections. These connections transmit this data via predefined input and output ports. FBP is inherently concurrent and promotes high levels of component reusability and separation of concerns.
This model aligns very well with Clojure's core.async and functional programming at large. Flowmaps is essentially a mapping of FBP concepts and ergonomics on top core.async. Allowing the user to be less concerned with it - just write the "meat" of their flows - and get it's performance and benefits by default.
While it's nomenclature may diverge from Morrison's FBP terminology to be more clear in a Clojure world - it is still very much FBP by heart.
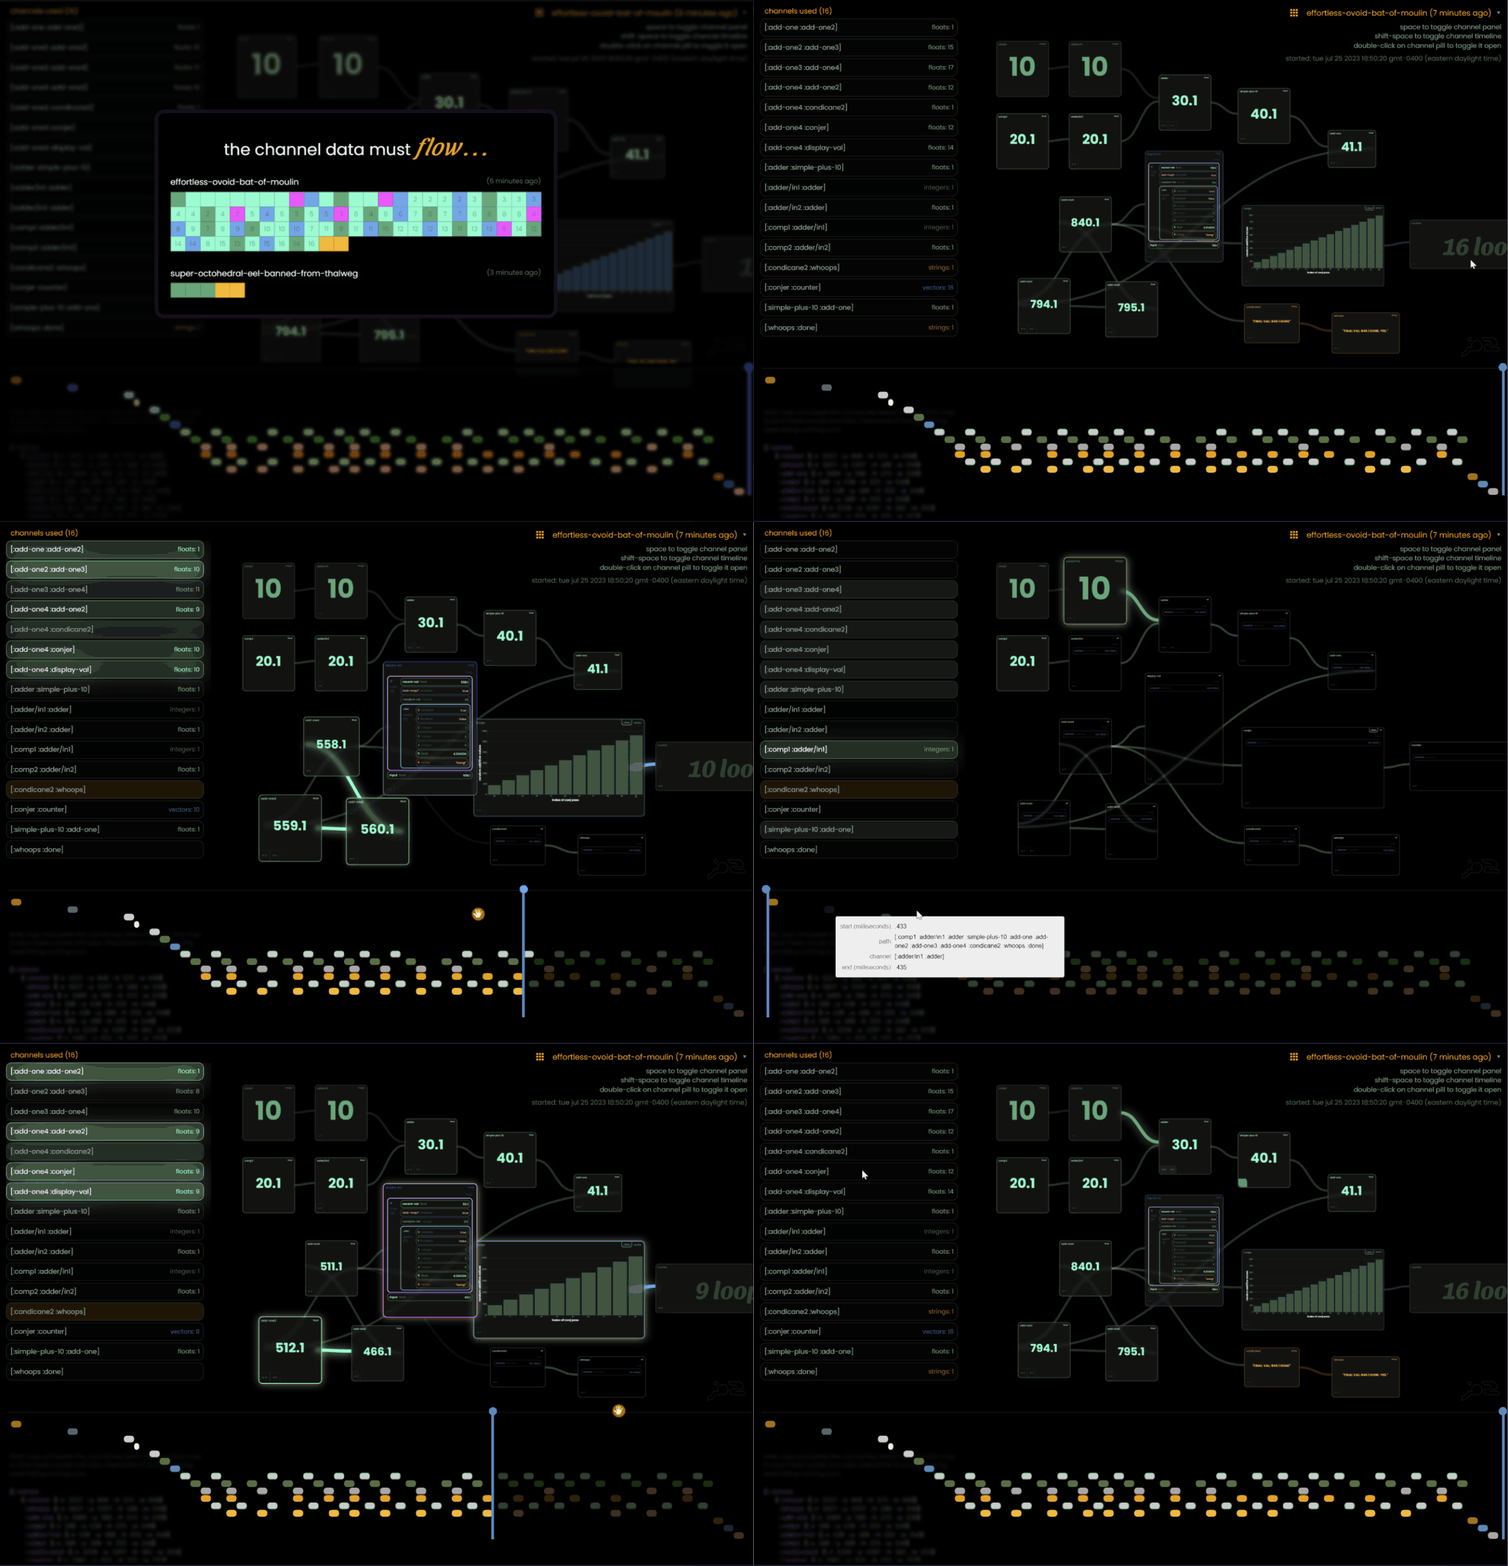
Flow-maps also provides a rabbit-ui visualizer / debugger to help UNDERSTAND and SEE how these flows are executed, their parallelism (if any), and more importantly - interactive experimentation and iterative development. One of the benefits of FBP is the ability for teams to better comprehend large complex systems as drawn out as boxes and lines - I wanted to provide a "live" version of that.
"I wanted to write core.async flows w/o a blindfold"
How to get started
Basics - from the REPL (w lein)
- Add flowmaps to your deps
[com.ryrobes/flowmaps "0.31-SNAPSHOT"]
- Boot up your REPL
lein repl
- Include flowmaps.core and flowmaps.web
(require '[flowmaps.core :as fm] '[flowmaps.web :as fweb]) - Start up the Rabbit web-server and web-sockets
- (only needed for dev / prod can be headless)
(fweb/start!) ;; starts up the rabbit-ui viewer at http://localhost:8888/ - Open up the URL - but just leave it for now - http://localhost:8888/

-
Define a simple flow map
(def first-flow {:components {:starting 10 ;; static value to start the flow :add-one inc ;; function 1 :add-ten (fn [x] (+ 10 x))} ;; function 2 (reg anonymous fn) :connections [[:starting :add-one] ;; order of flow operations [:add-one :add-ten] ;; (which will become channels) [:add-ten :done]]}) ;; done just signals completion -
Start the flow
(fm/flow first-flow)-
this will
- create the channels required
- seed the starting value(s)
- values pass through functions, create new values for the next channel, etc
- everything flows downstream to the end
-
you will see lots of debug output from the various channels created and values flow through them.
- (they can be silenced with
(fm/flow first-flow {:debug? false}))

- (they can be silenced with
-
-
go back to Rabbit and select the running flow
-
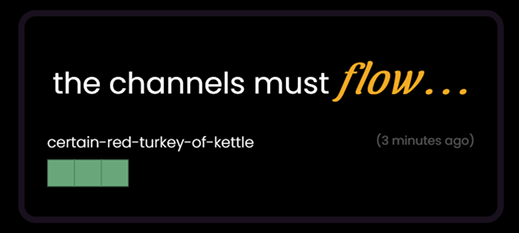
it will have a randomly generated name
-
each block represents a function, and it's color is based on it's output data type
-
(force a name with
(fm/flow first-flow {:flow-id "papa-het"}))
-
-
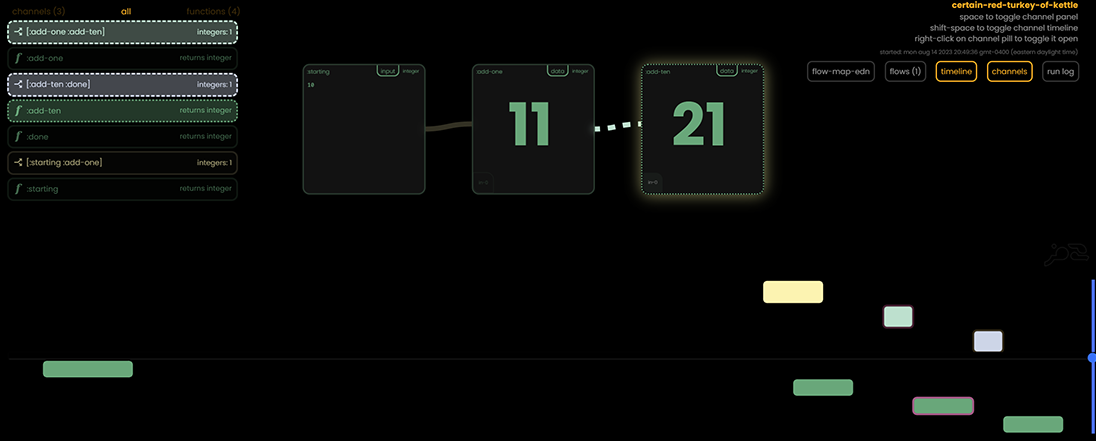
select the name to see the flow on the canvas
-
As you can see we started with 10, incremented to 11, added 10 - and ended up with 21
- the bottom timeline shows what channels and what functions ran, and we can scrub the blue line across time to see what the values were at that particular time. It's not quite illuminating in this simple example, but you can see how in complex flows with loops and conditional pathways how useful this can be.
-
Let's send another value - we COULD change the starting value and re-run the flow, essentially creating a new flow - but since we have Rabbit open and the channels are all still open - the flow is still "running" since the channels will react to a new value just like it did for our 10 we sent.
-
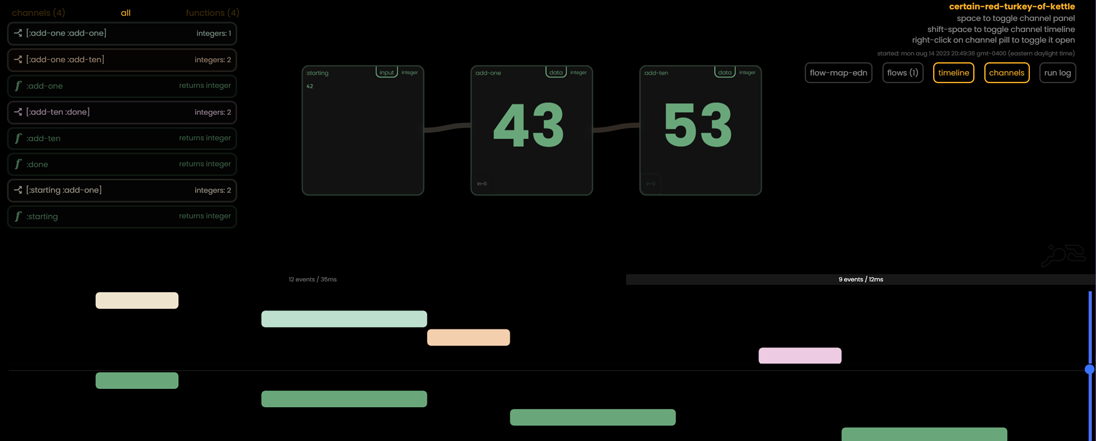
click on the 10 in the first block and change it to some other integer or float (remember we are applying math, so a string would error)
-
you can see that it just processed our new value - also notice that 2 bars have appeared above the timeline
- these are "time segments" of flow execution. Click back on the first one and you'll see our first run and the values in the blocks will change accordingly
-
back to the REPL - let's run it again more like you would in a production / embedded scenario
- Since flowmaps is based on Clojure's core.async we can't directly get a value back since it's all async execution.
- but we can provide an atom or ANOTHER channel (or the start of another flow) to pass the final value to when the flow reaches the pseudo
:doneblock (notice that :done did not render in Rabbit, since it's not a "real" block, just a signal or sorts) - to keep this example simple, let's just use an atom
(def my-results (atom nil)) ;; atom to hold the result (fm/flow first-flow ;; run a new version of the flow {:debug? false} ;; no console output my-results) ;; our atom @my-results ;; ==> 21 -
Neat. but what if I want to send other values instead? I don't really want to write new flows for each one.
- No problem, we can just "override" our starting block
(fm/flow first-flow {:debug? false} my-results {:starting 42069}) ;; a map with block names and override values @my-results ;; ==> 42080- In fact, you can override any block..
(fm/flow first-flow {:debug? false} my-results {:starting 42069 :add-ten #(* % 0.33)}) ;; ==> 13883.1 -
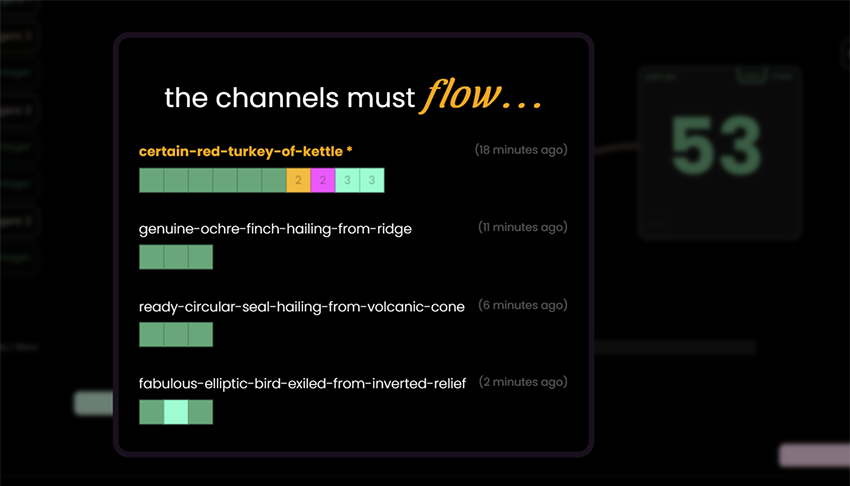
If we go back to our Rabbit web, we can see that since the web server was running all this time - these flows have actually been tracked and visualized as well.
-
Our first flow was run several times so there are more blocks shown
- additional runs created new IDs, since we didn't specify a :flow-id for the flow function
-
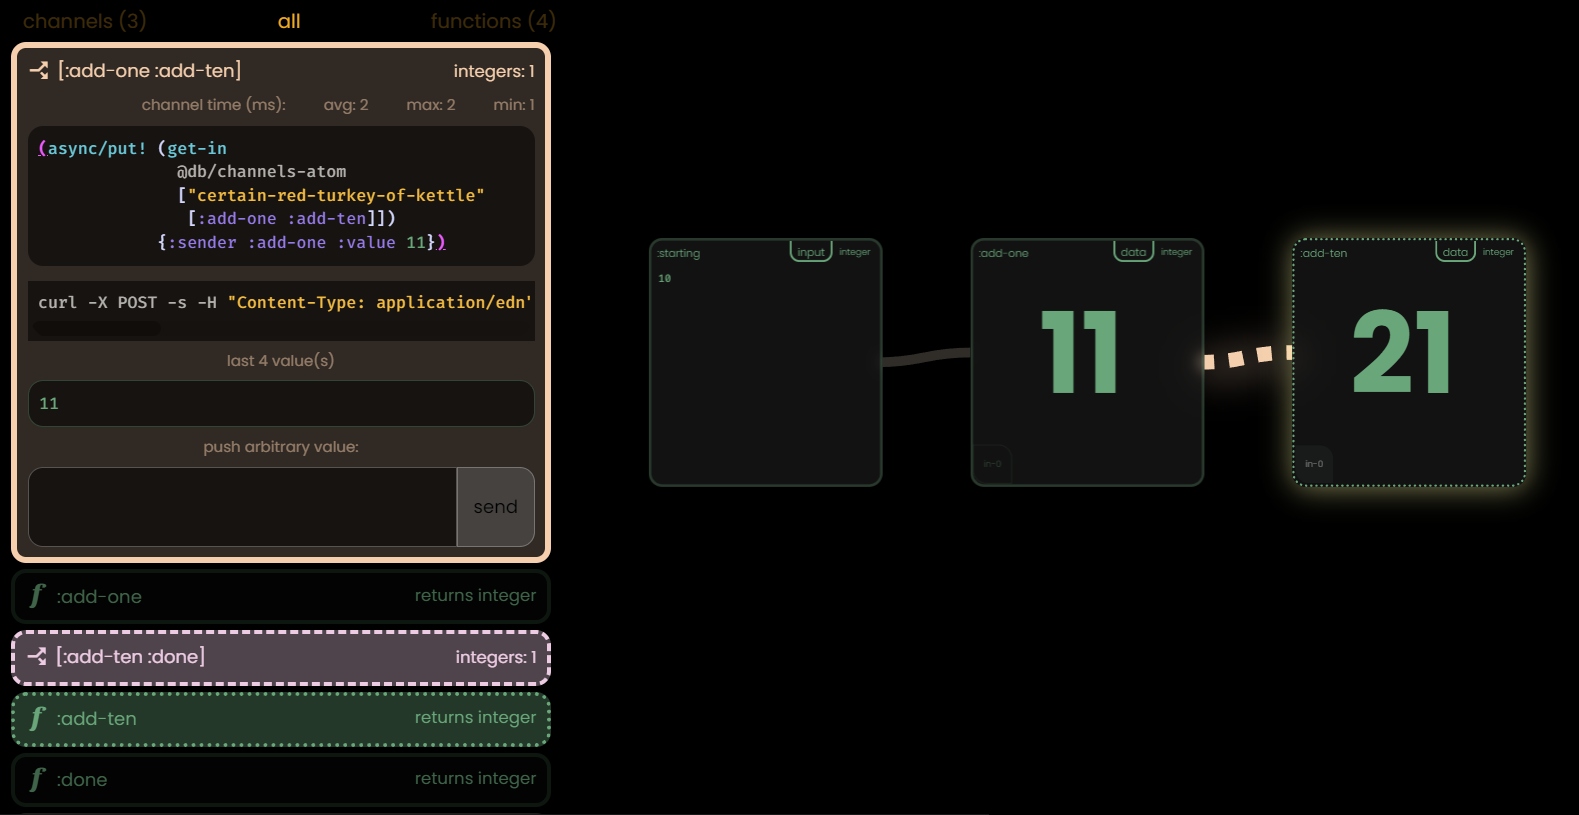
There are more ways we can "talk data" to our running flows - open up one and right-click on any channel on the left hand side
-
You'll see an options panel with 4 things in it
- a copy/paste command for using you REPL/app to send a value to that particular channel w async/put!
- a CURL command for sending a new value to that channel via the built-in REST endpoints(!)
- boxes containing the last 4 values this channel has seen, click to re-send them
- a text box to send an arbitrary value to that channel now (similar to earlier when we changed 10, but can be done on any channel)
-
Notice how I selected the
[:add-one :add-ten]channel - If I send a value here, it bypasses the upstream blocks, so you could essentially only use part of a flow
-
-
"Curiouser and curiouser!" cried Alice
Great! 🐇 Now that we've gone end-to-end on a simple example, we can start mixing in some more interesting options. Feel free to take a break here if you're a bit overwhelmed, I know how having tons of crap thrown at you at one time can be a negative experience. Maybe take some hammock time and consider what you're trying to accomplish and come back fresh!
That being said, let's mix in some more!
Conditional Paths
By default when you link a block to another - when the function successfully runs, whatever the resulting value was gets shipped to the next block via the channel that they share. They don't care, all the care about is getting new data and producing new values. If they have 10 output channels, they'll ship to 10 channels.
Think of it as a conveyor belt - each worker at each station isn't concerned with any other worker - only what is in front of them.
But sometimes you want to have a "special case" channel flow to occur. In flowmaps we use the :cond key for these conditional pathways.

{:description "simple example of conditional pathways"
               :components {:int1 10
                            :int2 21
                            :adder {:fn + ;; notice that adder has no "traditional" connections, just a bool set of condis
                                    :inputs [:in1 :in2]
                                    :cond {:odd? #(odd? %) ;; 2 bool conditional dyn outs with no "real" output flow below
                                           :even? #(even? %)}}
                            :odd? (fn [x] (when (odd? x) "odd!"))
                            :even? (fn [x] (when (even? x) "even!"))
                            :display-val {:fn (fn [x] x)
                                          :view (fn [x] [:re-com/box
                                                         :align :center :justify :center
                                                         :style {:font-size "105px"
                                                                 :color "orange"
                                                                 :font-family "Sansita Swashed"}
                                                         :child (str x)])}}
               :connections [[:int1 :adder/in1]
                             [:int2 :adder/in2] ;; notice that nothing connects TO :odd?, :even? here since it's logic is handled above
                             [:odd? :display-val] ;; but we DO need to handle FROM both possibilities
                             [:even? :display-val]
                             [:display-val :done]]}
Note: they can be used in conjunction with "regular pathways" (that always ship) or you can have a block with only conditional pathways. A simple example would be odd or even. They both cannot be true at the same time, but one HAS to be true if we're receiving numbers, so the flow continues. However, what if we had 3 conditional pathways... odd? even? divisible-by-6? In this case sometimes we'd have 2 conditional channels shipping at times.
This can also be used for loops - taking a self-referential / recursive path until some condition is met and then breaking out of it.
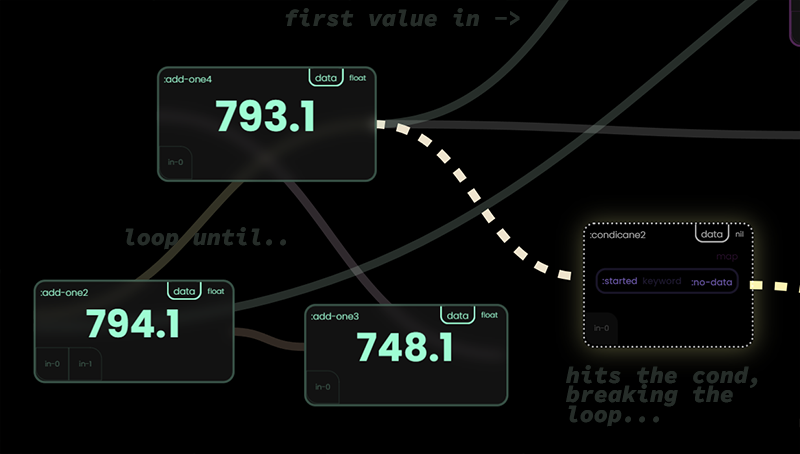
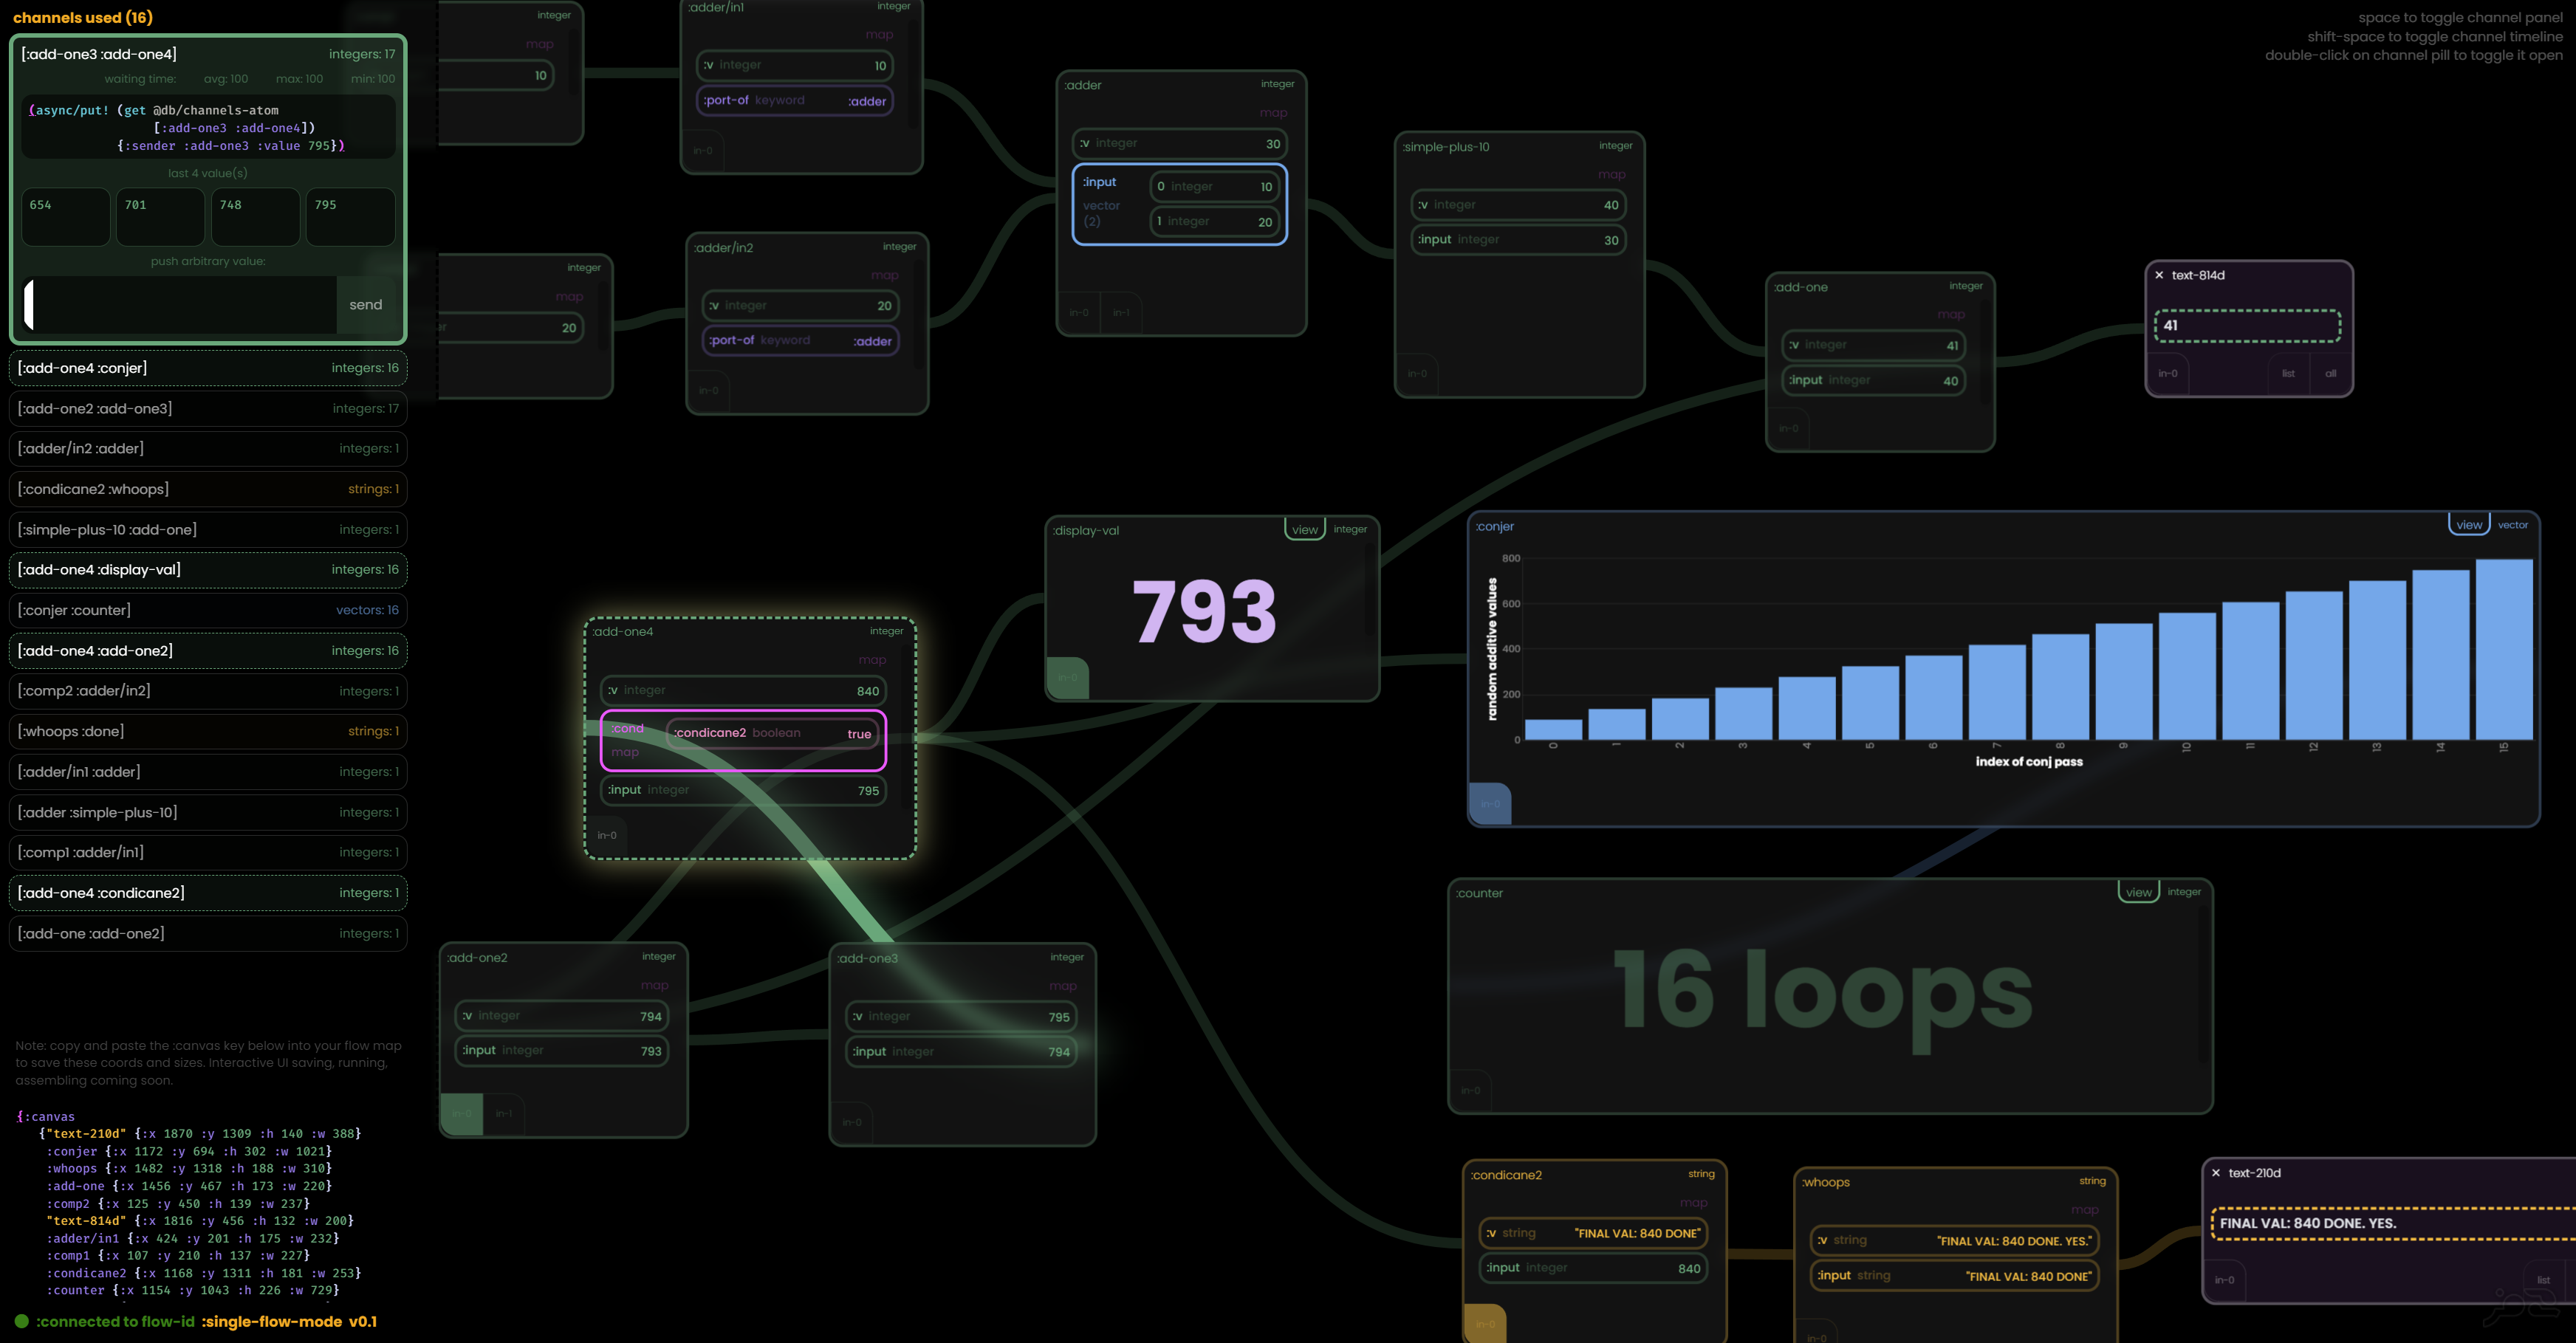
Slightly harder to explain, but the cond in this example essentially breaks the recursion. Also notice that for each loop the data continues right-ward for side-effects to other blocks also.
{:components {:comp1 10
              :comp2 20.1
              :comp3 [133 45]
              :simple-plus-10 {:fn #(+ 10 %)}
              :add-one {:fn #(+ % 1)}
              :add-one2 {:fn #(+ 1 %)}
              :add-one3 {:fn #(+ 1 %)}
              :counter {:fn #(count %)
                         :view (fn [x] (str x " loops"))}
               :conjer {:fn (fn [x] (defonce vv (atom []))
                                    (do (swap! vv conj x) @vv))}
               :add-one4 {:fn #(+ 45 %)
                          :cond {:condicane2 #(> % 800)}} ;; here is the loop breaker
               :display-val {:fn (fn [x] x)}
               :whoops {:fn #(str % ". YES.")}
               :condicane2 {:fn #(str "FINAL VAL: " % " DONE")}
               :adder {:fn +
                       :inputs [:in1 :in2]}}
 :connections [[:comp1 :adder/in1]
               [:comp2 :adder/in2]
               [:adder :simple-plus-10]
               [:condicane2 :whoops]
               [:add-one4 :add-one2] ;; recur
               [:add-one4 :display-val]
               [:add-one4 :conjer]
               [:conjer :counter]
               [:whoops :done]
               [:simple-plus-10 :add-one]
               [:add-one :add-one2]
               [:add-one2 :add-one3]
               [:add-one3 :add-one4]]}
Optional block "views"
A great thing about having an awesome viewer for our flows with Rabbit, is that we can add some spice to pipelines that otherwise would be very plain. Now, granted, in full-on headless production mode we wouldn't be using Rabbit - but in many cases (like ETL pipelines, manually run processes, etc) we have no problem using Rabbit to run things - so why not add some extra bit of custom observability to our flow?
Each block can have a :view function defined which is run after the main function, and passes the return output to the :view function. This is run server-side and can return a custom string (gotta love the classics) that will be rendered nicely in the center of the block - or you can return Clojure Hiccup HTML structures, keywordized re-com components, or a vega-lite spec for visualization.
You can use a simple string and it'll be rendered "pretty".
                :extract {:fn (fn [_] ;; ignoring actual sent value here - it's a trigger / signal
                                (let [db {:subprotocol "sqlite"
                                          :subname "/home/ryanr/boston-crime-data.db"}]
                                  (jdbc/query db ["SELECT o.*, substring(occurred_on_date, 0, 11) as ON_DATE FROM offenses o"])))
                          :view (fn [x] (str "Extracted " (ut/nf (count x)) " rows"))}
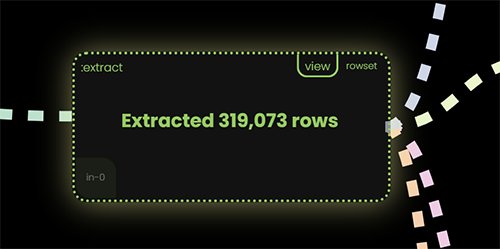
Or you can use hiccup and keywordized re-com components! Go nuts.
                :extract {:fn (fn [_] ;; ignoring actual sent value here for demo purposes (it's a trigger / signal)
                                (let [db {:subprotocol "sqlite"
                                          :subname "/home/ryanr/boston-crime-data.db"}]
                                  (jdbc/query db ["SELECT o.*, substring(occurred_on_date, 0, 11) as ON_DATE FROM offenses o"])))
                          ;:view (fn [x] (str "Extracted " (ut/nf (count x)) " rows"))
                          :view (fn [x] [:re-com/v-box
                                         :size "auto"
                                         :align :center :justify :center
                                         :style {:border "3px dotted yellow"
                                                 :font-size "33px"
                                                 :color "yellow"
                                                 :font-family "Merriweather"
                                                 :background-color "maroon"}
                                         :children [[:re-com/box :size "auto"
                                                     :child "Extracted:"]
                                                    [:re-com/box :size "auto"
                                                     :child (str (ut/nf (count x)) " rows")]]])}
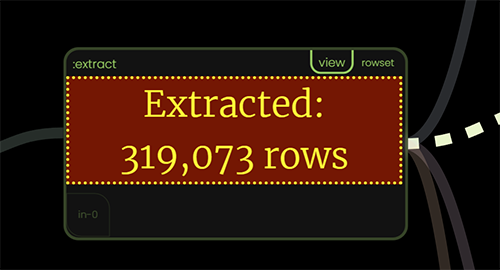
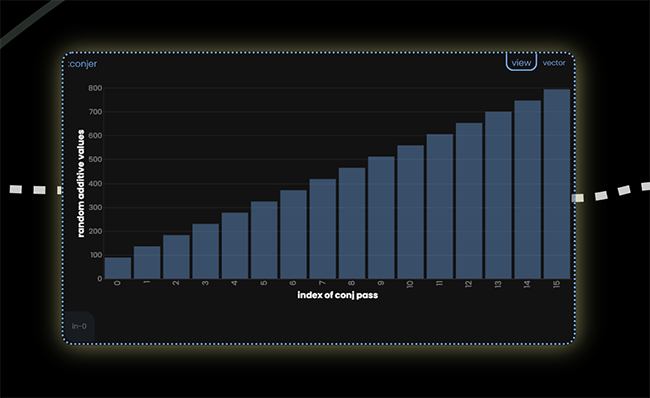
...or... 👀
                               :conjer {:fn (fn [x]
                                              (defonce vv (atom [])) ;; block has "local state" for each value it sees
                                              (do (swap! vv conj x) @vv))
                                        :view (fn [x]                ;; lets draw a bar as the data comes in row by row
                                                [:vega-lite {:data {:values (map-indexed (fn [index value]
                                                                                           {:index index
                                                                                            :value value}) x)}
                                                             :mark {:type "bar"
                                                                    :color "#60a9eb66"}
                                                             :encoding {:x {:field "index" :type "ordinal"
                                                                            :title "index of conj pass"
                                                                            :axis {:labelColor "#ffffff77"
                                                                                   :ticks false
                                                                                   :titleColor "#ffffff"
                                                                                   :gridColor "#ffffff11"
                                                                                   :labelFont "Poppins"
                                                                                   :titleFont "Poppins"
                                                                                   :domainColor "#ffffff11"}}
                                                                        :y {:field "value" :type "quantitative"
                                                                            :title "random additive values"
                                                                            :axis {:labelColor "#ffffff77"
                                                                                   :titleColor "#ffffff"
                                                                                   :ticks false
                                                                                    ;:gridColor "#00000000"
                                                                                   :gridColor "#ffffff11"
                                                                                   :labelFont "Poppins"
                                                                                   :titleFont "Poppins"
                                                                                   :labelFontSize 9
                                                                                   :labelLimit 180
                                                                                   ;;:labelFontStyle {:color "blue"}
                                                                                   :domainColor "#ffffff11"}}}
                                                             :padding {:top 15 :left 15}
                                                             :width "container"
                                                             :height :height-int
                                                             :background "transparent"
                                                             :config {:style {"guide-label" {:fill "#ffffff77"}
                                                                              "guide-title" {:fill "#ffffff77"}}
                                                                      :view {:stroke "#00000000"}}} {:actions false}])}
As a funny aside, I was using chatGPT to create sample flows to test out some edge cases, and it usually interprets the :view key as a first class feature, it created a color scale block when I asked for a flow that is "interesting".
{:description "sample flow created by GPT4 for testing purposes (color art hiccup)"
 :components {:seed 45
              :generate-sequence
                {:fn (fn [n]
                       (map #(/ % n) (range n)))
                 :view (fn [x]
                         [:re-com/box :size "auto" :padding "6px"
                          :child (str "Generated sequence: " (pr-str x))])}
              :generate-colors
                {:fn (fn [sequence]
                       (map #(str "hsl(" (* % 360) ",100%,50%)") sequence))
                 :inputs [:sequence]
                 :view (fn [x]
                         [:re-com/box :size "auto" :padding "6px"
                          :child (str "Generated colors: " (pr-str x))])}
              :render-art
                {:fn (fn [colors]
                       [:re-com/h-box
                        :children (map (fn [color]
                                         [:div
                                          {:style
                                           {:background-color color
                                            :width "20px"
                                            :height :height-int}}]) colors)])
                 :inputs [:colors]
                 :view (fn [x]
                         [:re-com/box
                          :child x])}}
 :connections
   [[:seed :generate-sequence]
    [:generate-sequence :generate-colors/sequence]
    [:generate-colors :render-art/colors]]}
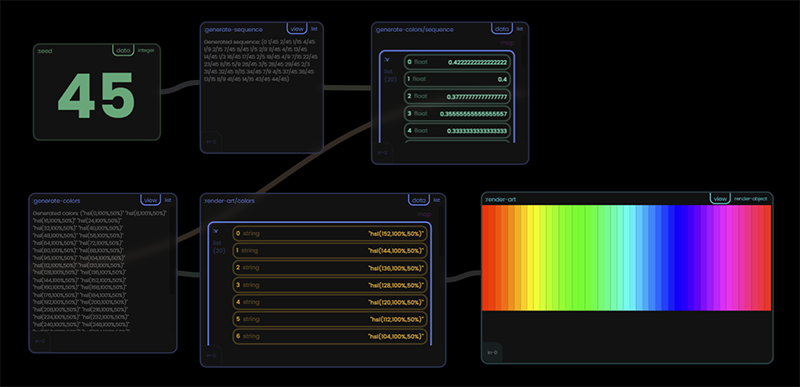
Static value inputs

We briefly passed over this in the "mutate" values part of the intro above - any static value block will editable as a code window on the Rabbit canvas. Integer, string, float, map, etc - it's an easy way to test things out / experiment.
Optional block "speak" / text-to-speech
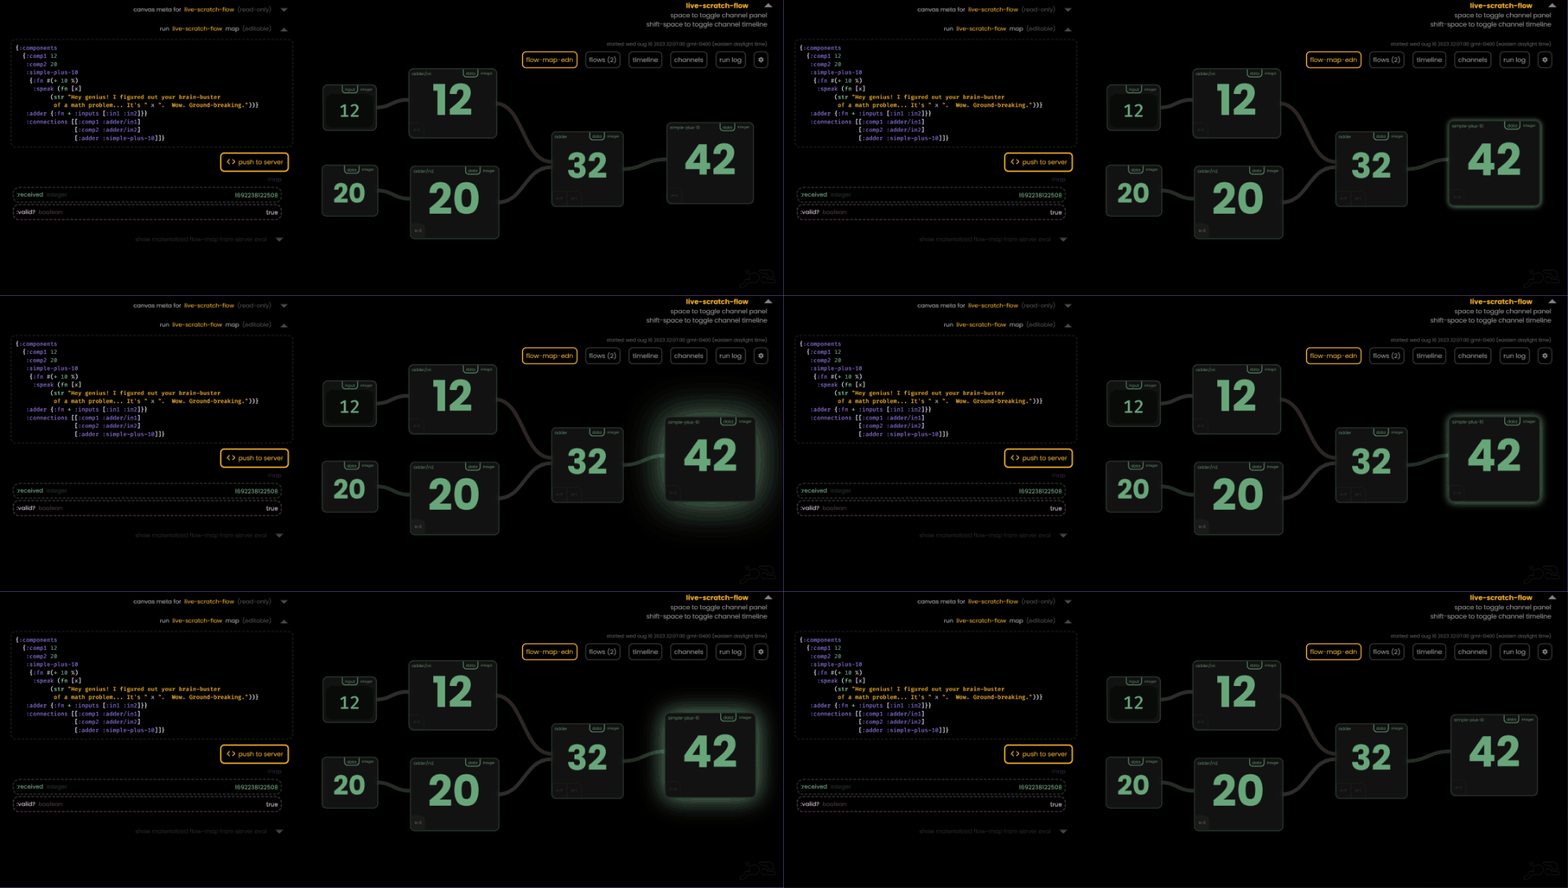
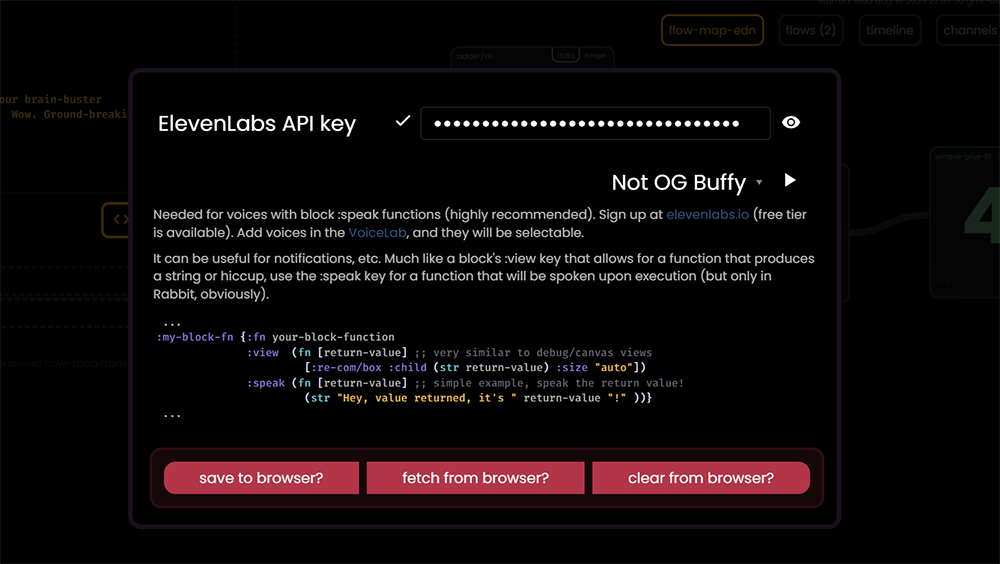
Much like optional block "views" above - :speak can hold an function that takes in the return value of the main block function and produces a value that will be spoken in the Rabbit UI. However, this requires that add an ElevenLabs API key via the Rabbit settings panel (hit the gears icon in the upper right of the canvas), where you can also choose what voice to use via a dropdown. This can be done for fun, or for audio "notifications" depending on your flow use cases. Again, if you are running headlessly, this is ignored and will have no impact on anything.
{:components ;; example of "speaking block"
  {:comp1 12
   :comp2 20
   :simple-plus-10
    {:fn #(+ 10 %)
     :speak (fn [x] ;; gets the return / output of the fn above ^
          (str "Hey genius! I figured out your brain-buster
           of a math problem... It's " x ".  Wow. Ground-breaking."))}
   :adder {:fn + :inputs [:in1 :in2]}}
   :connections [[:comp1 :adder/in1]
                 [:comp2 :adder/in2]
                 [:adder :simple-plus-10]]}
Grid data / "rowsets"

Just a helper in the Rabbit UI, if something is detected as a "rowset" (a 'pseudo data-type' = a vector of uniform maps), often used in REST APIs and database resultsets - there will be a "grid" option for the block (which is virtualized and much less expensive to render than the general Clojure data nested box renderer that Rabbit uses).
Note: by default we will only send a limited number of rows to the UI, it's just a sample as to not overwhelm the browser.
More on multi-input Blocks (input "ports")
As we can see with block functions with multi-input "port" blocks - a block with multiple inputs will automatically WAIT for all blocks to respond before it executes, however - on subsequent runs if it receives a partial result it will use the old value from the secondary source. I'm looking to add some more options to control this flow in the future FYI.
Optional block "canvas" metadata
By default the flow blocks will be arranged with a very basic algo, which is most likely not what you will want. Feel free to drag around and resize the blocks as you see fit. However, these positions will be lost next time the flow is run unless we persist these values.
Open up the flow-map-edn panel from the top right panel button. You'll see a new panel with all the current canvas metadata, feels free to copy-paste this into your flowmap under a :canvas key. You'll see several sample flows that use this by default. Again, totally optional, but if you and your team use Rabbit to inspect flows frequently having a nice layout can be very helpful.

You'll also notice that we save the "view mode" for each block, which can be helpful if you want to default a view/grid/input mode upon next loading.
{:components {...}
 :connections [...] ;; just drag things around ^^ and paste it in to your flow map!
 :canvas  {:comp1 {:x 100 :y 100 :h 255 :w 240 :view-mode "data"}
           :adder/in1 {:x 430 :y 100 :h 255 :w 240 :view-mode "data"}
           :comp2 {:x 100 :y 430 :h 255 :w 240 :view-mode "data"}
           :adder/in2 {:x 430 :y 430 :h 255 :w 240 :view-mode "data"}
           :adder {:x 768 :y 413 :h 255 :w 240 :view-mode "data"}
           :simple-plus-10 {:x 1111 :y 419 :h 255 :w 240 :view-mode "data"}}}
Writing a flow from the Rabbit canvas
TODO
Features List (boring)
Core "flow runner" features
- built on Clojure's core.async channels for concurrency & performance
- channels can be written to and read by any other part of your program, flowmaps just coordinates them into "flowing chain" of reactive functions and channels with just some map keys
- multi-input blocks (all inputs will wait automatically)
- conditional pathing
- a straightforward "map-based" interface for configuration
- each block and channel can optionally be read and written to via an HTTP REST endpoint
- ability for a "result value" of the entire flow to "ship out" of the flow to an external channel or atom into the rest of your application
- flow> macro to turn a threading macro (->) shape into a starter flow-map
"Rabbit" front-end debugger features (optional)
- canvas based placement and arrangement to "see" your blocks (fns) and how they relate to each other via their connections (async channels)
- watching the flow "play out" visually
- "hijacking" channels to send arbitrary values to them and watch the resulting chain-reactions
- optional block "views" (as in screenshot above), gives you the ability to write hiccup, re-com, and vega specs to render the values as they flow through the system - very useful in debugging or just monitoring your flow as it runs
- simple gantt chart timeline to better understand flow parallelism
- time scrubbing - go back in time and see previous values and how they "flowed"
- interactive flow building - a small eval window can help you iterate on your flows without leaving the UI (WIP)
- Linear run log
Flow examples
Basic flow
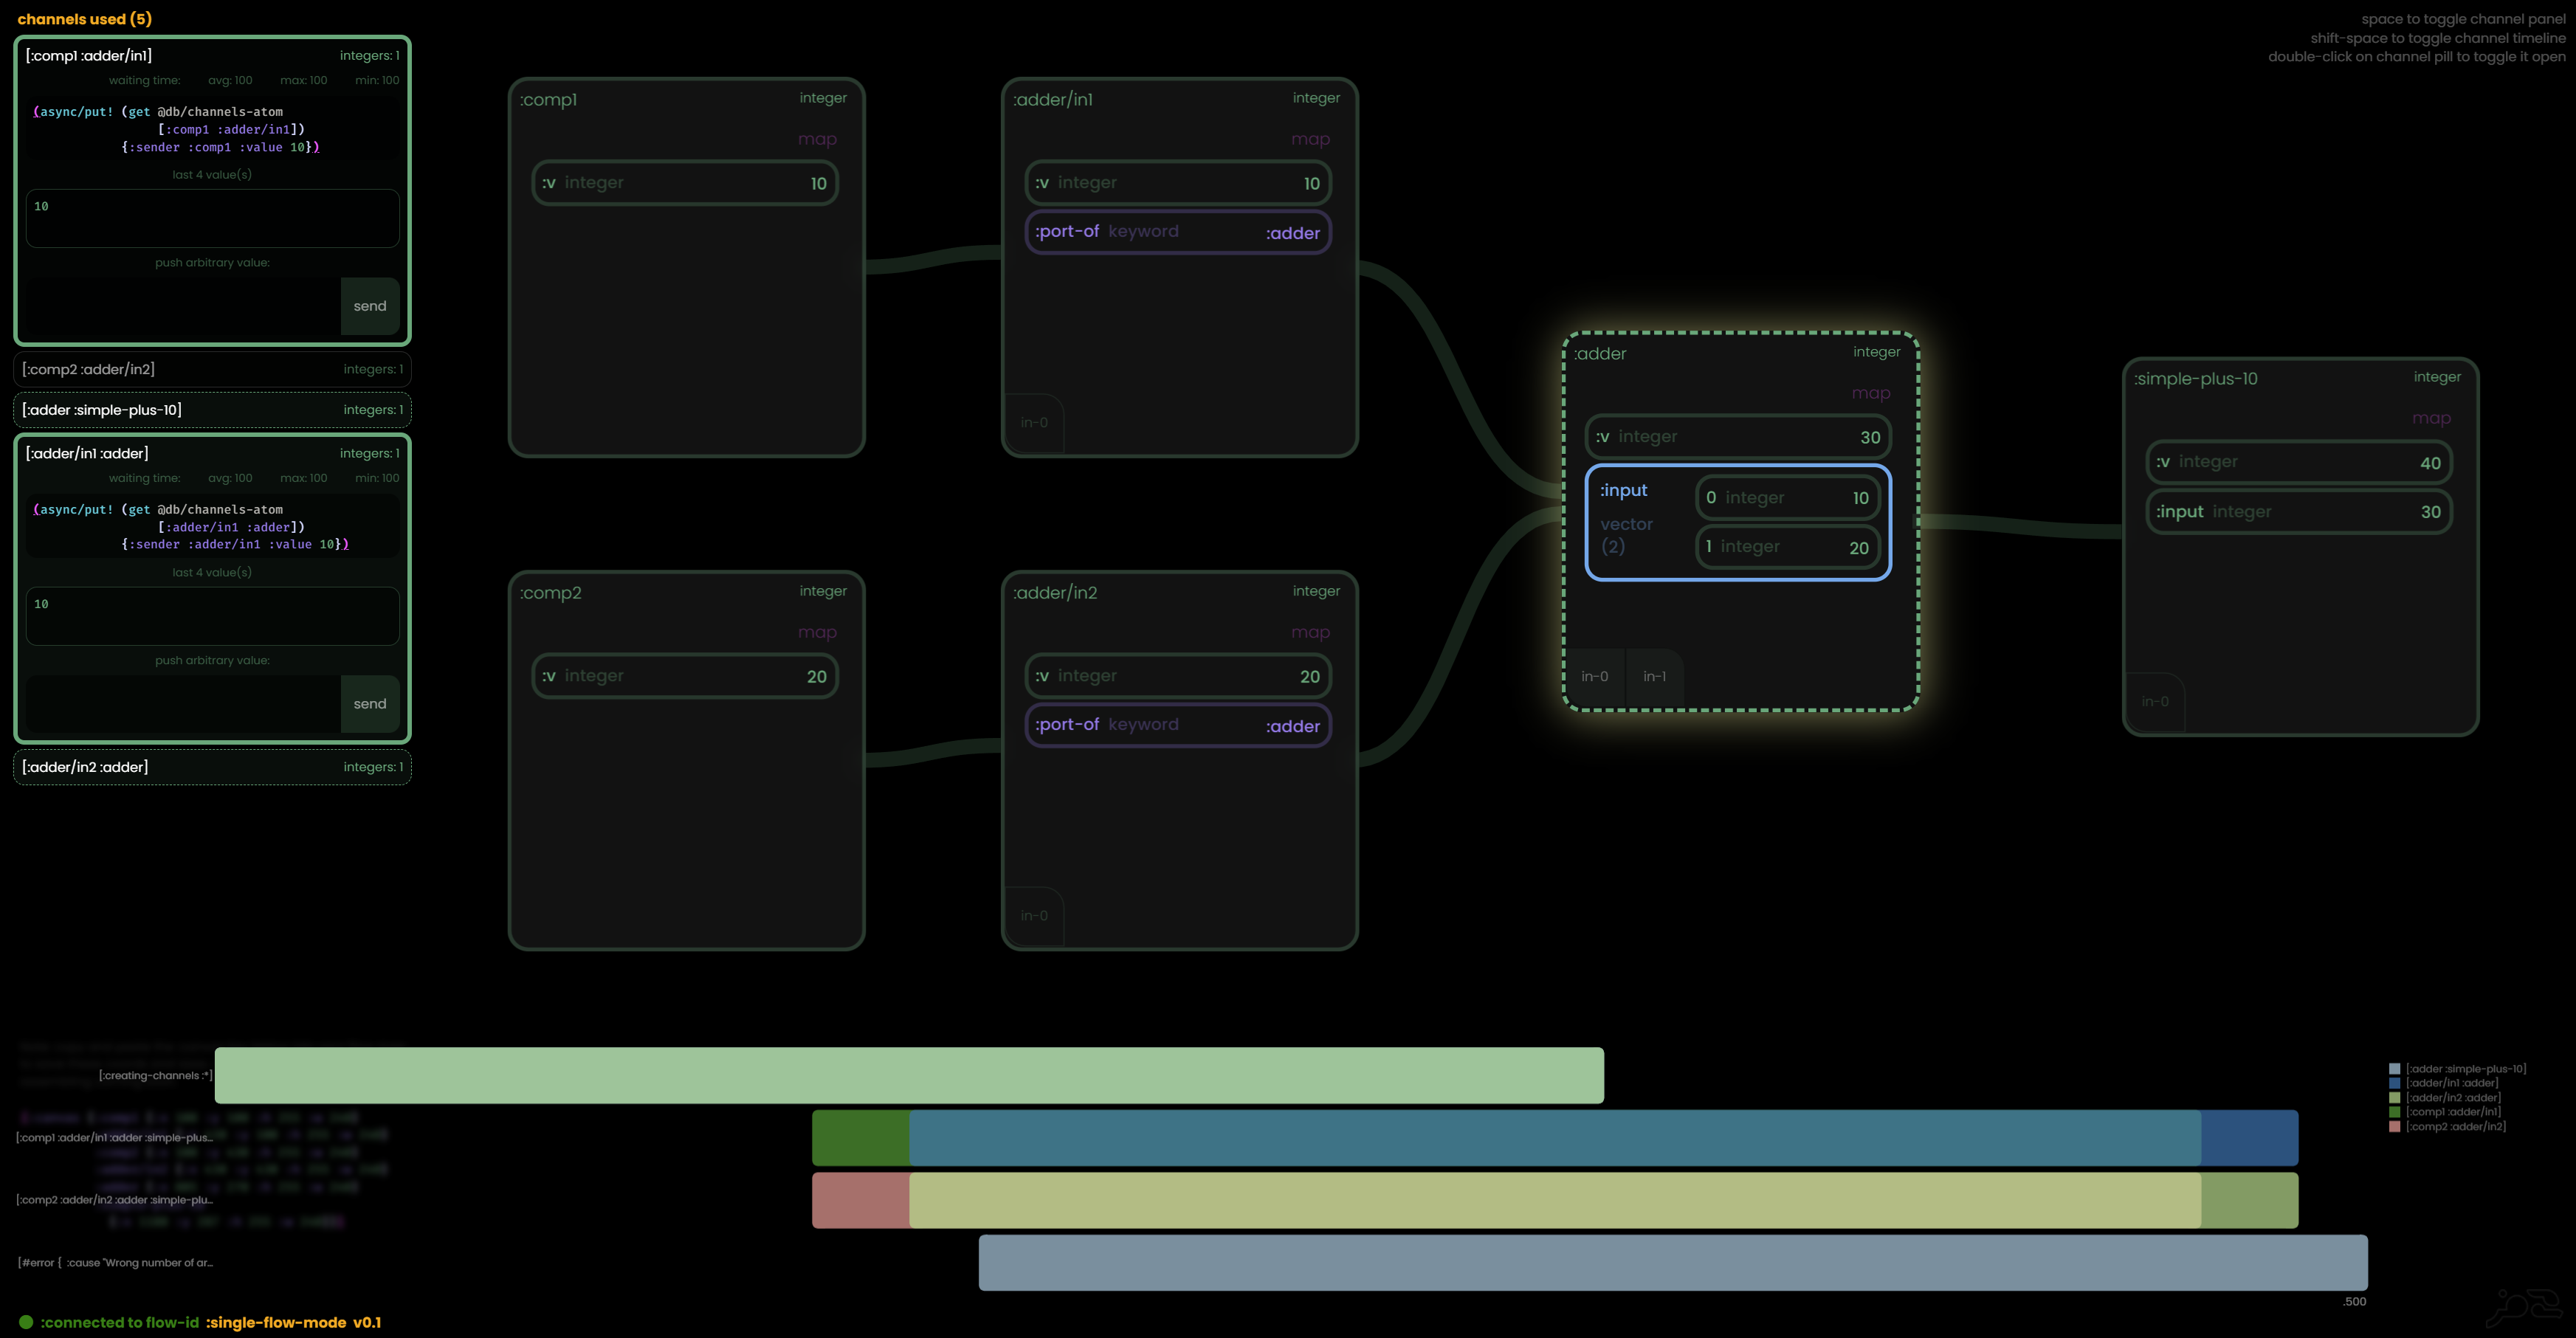
Contains a multi-input block, a single-input but explicitly defined block, a fn only block, and some static values.
Simple sample usage:
(ns my-app.core
  (:require [flowmaps.core :as fm]
            [flowmaps.web :as fweb])
  (:gen-class))

(def first-flow {:description "my first flow!" ;; optional, can be helpful when working w multiple flows in the UI
                 :components {:comp1 10 ;; static "starter value"
                              :comp2 20 ;; static "starter value"
                              :simple-plus-10 #(+ 10 %) ;; wrapping useful for single input blocks
                              :adder {:fn + ;; multi input uses "apply" after materializing inputs
                                      :inputs [:in1 :in2]}}
                 :connections [[:comp1 :adder/in1] ;; specify the ports directly
                               [:comp2 :adder/in2]
                               [:adder :simple-plus-10]]}) ;; but use the whole block as output

(fweb/start!) ;; starts up the rabbit-ui viewer at http://localhost:8888/
(fm/flow first-flow) ;; starts the flow, look upon ye rabbit and rejoice!
TODO Explain what this does exactly.
Medium complexity
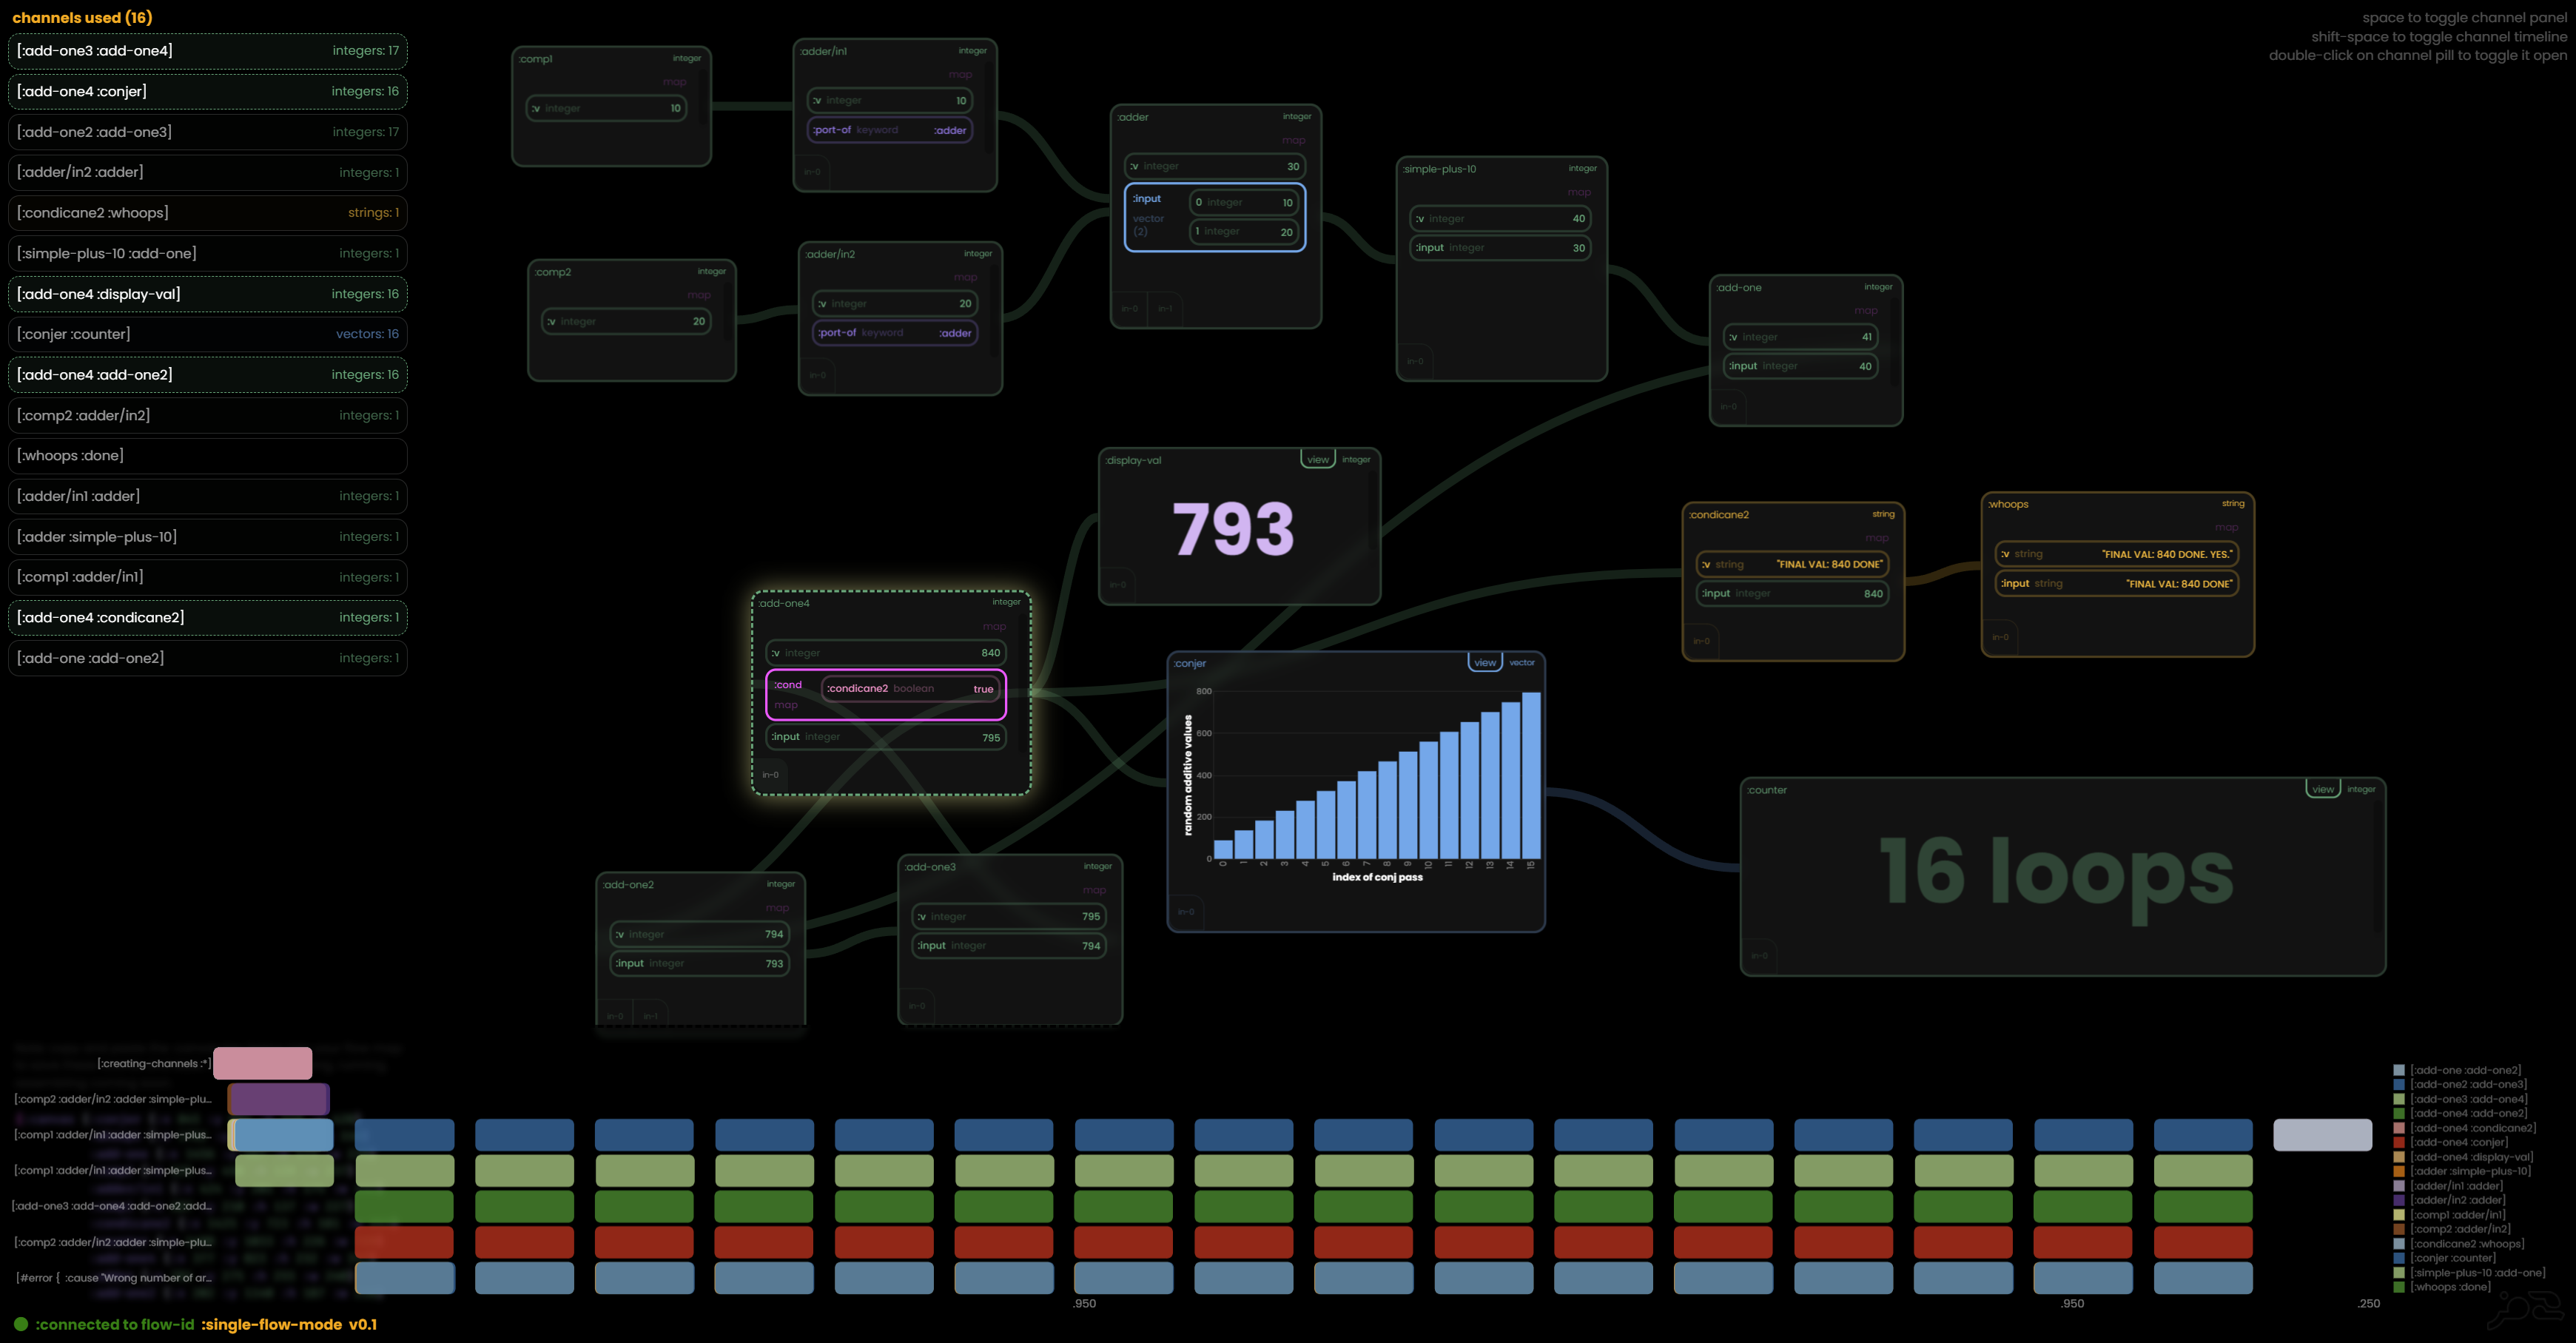
A slight ramp up in complexity from the above flow. Contains a loop that exists via a conditional path, some blocks that contain views, a block with it's own atom/state, and provides canvas metadata to rabbit for a pre-defined layout.
(ns my-app.core
  (:require [flowmaps.core :as fm]
            [flowmaps.web :as fweb])
  (:gen-class))

(def looping-net {:components {:comp1 10
                               :comp2 20
                               :comp3 [133 45] ;; static values (unless changed via an override - see below)
                               :simple-plus-10 {:fn #(+ 10 %)} ;; anon fns to easily "place" the input value explicitly
                               :add-one {:fn #(+ % 1)}
                               :add-one2 {:fn #(+ 1 %)}
                               :add-one3 {:fn #(+ 1 %)}
                               :counter {:fn #(count %)
                                         :view (fn [x] ;; simple "view" - materialized server-side, rendered by rabbit
                                                 [:re-com/box :child (str x " loops") ;; :re-com/box h-box v-box keywordized
                                                  :align :center :justify :center     ;; (just a re-com component)
                                                  :padding "10px"
                                                  :style {:color "#50a97855"
                                                          :font-weight 700
                                                          :font-size "100px"}])}
                               :conjer {:fn (fn [x] ;; block fn with it's own atom for collection values
                                              (defonce vv (atom []))
                                              (do (swap! vv conj x) @vv))
                                        :view (fn [x] ;; vega-lite via oz/vega-lite receives the OUTPUT of the fn above
                                                [:vega-lite {:data {:values (map-indexed (fn [index value]
                                                                                           {:index index
                                                                                            :value value}) x)}
                                                             :mark {:type "bar"
                                                                    :color "#60a9eb"}
                                                             :encoding {:x {:field "index" :type "ordinal"
                                                                            :title "index of conj pass"
                                                                            :axis {:labelColor "#ffffff77"
                                                                                   :ticks false
                                                                                   :titleColor "#ffffff"
                                                                                   :gridColor "#ffffff11"
                                                                                   :labelFont "Poppins"
                                                                                   :titleFont "Poppins"
                                                                                   :domainColor "#ffffff11"}}
                                                                        :y {:field "value" :type "quantitative"
                                                                            :title "random additive values"
                                                                            :axis {:labelColor "#ffffff77"
                                                                                   :titleColor "#ffffff"
                                                                                   :ticks false
                                                                                   :gridColor "#ffffff11"
                                                                                   :labelFont "Poppins"
                                                                                   :titleFont "Poppins"
                                                                                   :labelFontSize 9
                                                                                   :labelLimit 180
                                                                                   :domainColor "#ffffff11"}}}
                                                             :padding {:top 15 :left 15}
                                                             :width "container"
                                                             :height :height-int
                                                             :background "transparent"
                                                             :config {:style {"guide-label" {:fill "#ffffff77"}
                                                                              "guide-title" {:fill "#ffffff77"}}
                                                                      :view {:stroke "#00000000"}}} {:actions false}])}
                               :add-one4 {:fn #(do (Thread/sleep 120) (+ 45 %))
                                          :cond {:condicane2 #(> % 800)}} ;; a boolean fn that acts as conditional pathway
                               :display-val {:fn (fn [x] x) ;; this fn is just a pass-through, only used for rendering
                                             :view (fn [x]  ;; the values it passes here as re-com again
                                                     [:re-com/box :child (str x)
                                                      :align :center :justify :center
                                                      :padding "10px"
                                                      :style {:color "#D7B4F3"
                                                              :font-weight 700
                                                              :font-size "80px"}])}
                               :whoops {:fn #(str % ". YES.")}
                               :condicane {:fn #(str % " condicane!")}
                               :condicane2 {:fn #(str "FINAL VAL: " % " DONE")}
                               :baddie #(str % " is so bad!")
                               :baddie2 {:fn #(+ % 10)}
                               :adder {:fn +
                                       :inputs [:in1 :in2]}}
                  :connections [[:comp1 :adder/in1]
                                [:comp2 :adder/in2]
                                [:adder :simple-plus-10]
                                [:condicane2 :whoops]
                                [:add-one4 :add-one2]
                                [:add-one4 :display-val]
                                [:add-one4 :conjer]
                                [:conjer :counter]
                                [:whoops :done]
                                [:simple-plus-10 :add-one]
                                [:add-one :add-one2]
                                [:add-one2 :add-one3]
                                [:add-one3 :add-one4]]
                  :colors :Spectral ;; optional, can use Colorbrewer scales to change the channel color scale in the UI
                  ;; :YlGn :Spectral :Paired :Set2 :PuBu :GnBu :RdGy :Purples :YlOrBr :Pastel2 :Set3 :Greys :Greens
                  ;; :BrBG :PuOr :BuPu :RdYlGn :Reds :Accent :PRGn :Dark2 :PiYG :OrRd :PuBuGn :YlOrRd :BuGn :Oranges
                  ;; :RdYlBu :Blues :PuRd :RdBu :RdPu :Pastel1 :YlGnBu :Set1
                  :canvas ;; used for rabbit placement. ignored otherwise.
                  {:conjer {:x 845 :y 891 :h 319 :w 428}
                   :whoops {:x 1482 :y 1318 :h 188 :w 310}
                   :add-one {:x 1456 :y 467 :h 173 :w 220}
                   :comp2 {:x 125 :y 450 :h 139 :w 237}
                   :adder/in1 {:x 424 :y 201 :h 175 :w 232}
                   :comp1 {:x 107 :y 210 :h 137 :w 227}
                   :condicane2 {:x 1168 :y 1311 :h 181 :w 253}
                   :counter {:x 1835 :y 1060 :h 226 :w 729}
                   :add-one4 {:x 377 :y 823 :h 232 :w 317}
                   :adder {:x 781 :y 275 :h 255 :w 240}
                   :add-one2 {:x 202 :y 1140 :h 187 :w 238}
                   :simple-plus-10 {:x 1103 :y 334 :h 255 :w 240}
                   :add-one3 {:x 542 :y 1120 :h 195 :w 255}
                   :display-val {:x 768 :y 662 :h 179 :w 320}
                   :adder/in2 {:x 430 :y 430 :h 175 :w 232}}})

(fweb/start!) ;; starts up the rabbit-ui viewer at http://localhost:8888/
(fm/flow looping-flow) ;; starts the flow, look upon ye rabbit and rejoice!
"flow" function options
The "flowmaps.core/flow" fn is what creates the channels and executes the flow by pushing static values on to the starter channels. Think of it as setting up the dominoes and tapping the first one. From there on out it's in the hands of the channel connections and the "flowmaps.core/process", which you shouldn't need to ever user directly.
(flow flow-map ;; the map that defines the flow (see above examples and explanation)
      options  ;; currently only {:debug? true/false} defaults to true, false will silence the output
      opt-output-channel-or-atom ;; given an external channel or atom - will populate it once the flow
                                 ;; reaches a block called :done - out to the rest of your app or whatever
      value-overrides-map) ;; hijack some input values on static "starter" blocks {:block-target new-val}
                           ;; typically use for replacing existing values in a flow-map, it's technically
                           ;; replacing the entire block, so it could be a fn or a block map as well
Simple options example:
(ns my-app.core
  (:require [flowmaps.core :as fm]
            [flowmaps.web :as fweb])
  (:gen-class))

(def my-flow {:components {:start1 10
                           :start2 20
                           :* {:fn * :inputs [:in1 :in2]}}
              :connections [[:start1 :*/in1]
                            [:start2 :*/in2]
                            [:* :done]]}) ;; note the :done meta block, so it knows what to "return"

(def res (atom nil)) ;; create an atom to hold the value (could also use a channel)
(fweb/start!) ;; starts up a rabbit at http://localhost:8888/

(fm/flow my-flow {:debug? false} res) ;; adding res atom as the eventual receiver of the final value / signal

@res
;; returns:  200

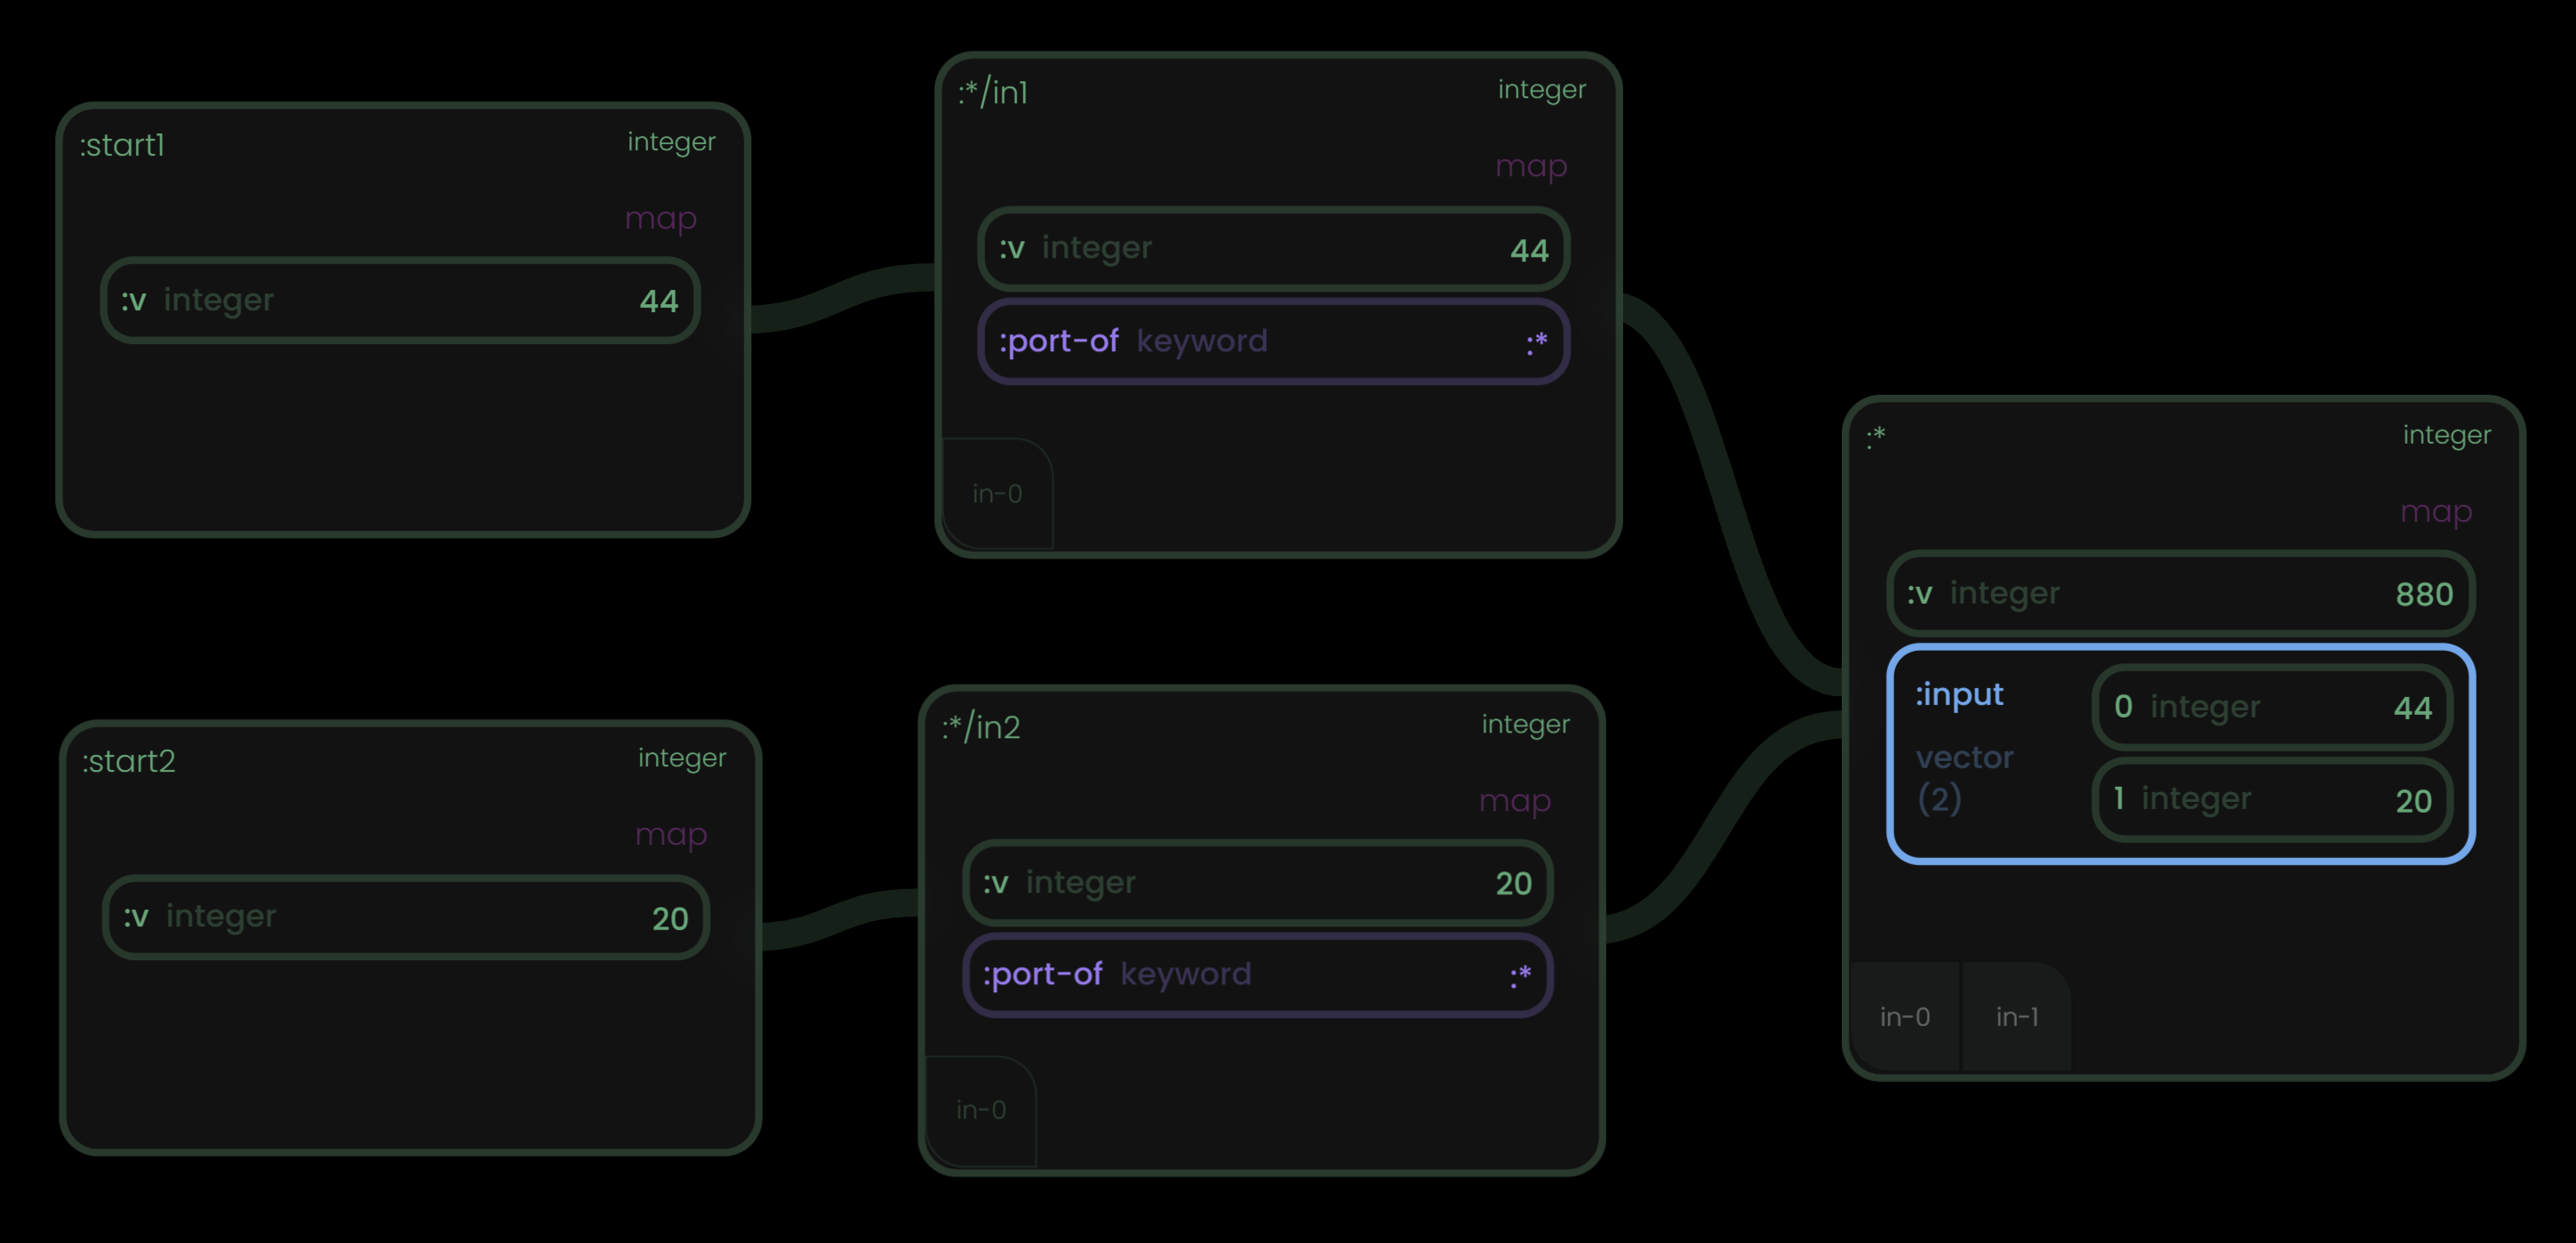
(fm/flow my-flow {:debug? false} res {:start1 44}) ;; will "override" the value of 10

@res
;; returns:  880
(above as shown in rabbit)
"flow-results" function
Work in progress. Iterates through the various "paths" that have been resolved and gives the last value of each of those steps. Example:
;; given the flow-map in the example above...

(fm/flow-results) ;; no params, will eventually require a flow-id key

;; returns:
{:resolved-paths-end-values
    ({[:start2 :*/in2 :* :done] ;;a singular "path" or "track"
              ([:start2 20] [:*/in2 {:port-in? true, :*/in2 20}] [:* 200] [:done 200])} ;; the results
     {[:start1 :*/in1 :* :done]
              ([:start1 10] [:*/in1 {:port-in? true, :*/in1 10}] [:* 200] [:done 200])})}
"flow>" macro
The flowmaps.core/flow> macro is a quick way to "bootstrap" a flow-map from a common "threading shape" (->) you see in Clojure.
(flow> 10 #(* 2 %) #(- % 3) #(+ 10 %) inc inc dec (fn[x] (str x "!")))

;; will return
{:components {:step7 #object
                    [clojure.core$dec 0x2f8bfcf4
                    "clojure.core$dec@2f8bfcf4"]
            :step2 #object
                    [clojure.core$eval27888$fn__27889 0x2fe0bfd7
                    "clojure.core$eval27888$fn__27889@2fe0bfd7"]
            :step4 #object
                    [clojure.core$eval27888$fn__27891 0x5525a2ae
                    "clojure.core$eval27888$fn__27891@5525a2ae"]
            :step1 10
            :step3 #object
                    [clojure.core$eval27888$fn__27893 0x7f66eca3
                    "clojure.core$eval27888$fn__27893@7f66eca3"]
            :step5 #object
                    [clojure.core$inc 0x219627cd
                    "clojure.core$inc@219627cd"]
            :step8 #object
                    [clojure.core$eval27888$fn__27895 0x5bfe0d5
                    "clojure.core$eval27888$fn__27895@5bfe0d5"]
            :step6 #object
                    [clojure.core$inc 0x219627cd
                    "clojure.core$inc@219627cd"]}
:connections [[:step1 :step2] [:step2 :step3] [:step3 :step4]
            [:step4 :step5] [:step5 :step6] [:step6 :step7]
            [:step7 :step8]]}

While obviously not ideal for many circumstances (since the functions get auto-compiled), it can be useful creating a base template that then gets edited into later (replacing the compiler refs with original functions)
;; also if can be handy for quick example flows
(flow (flow> 10 #(* 2 %) #(- % 3) #(+ 10 %) inc inc dec (fn[x] (str x "!"))))

;; and teaching people how to "map" flowmaps graph model to something already understood like a ->
Quick Rabbit UI primer
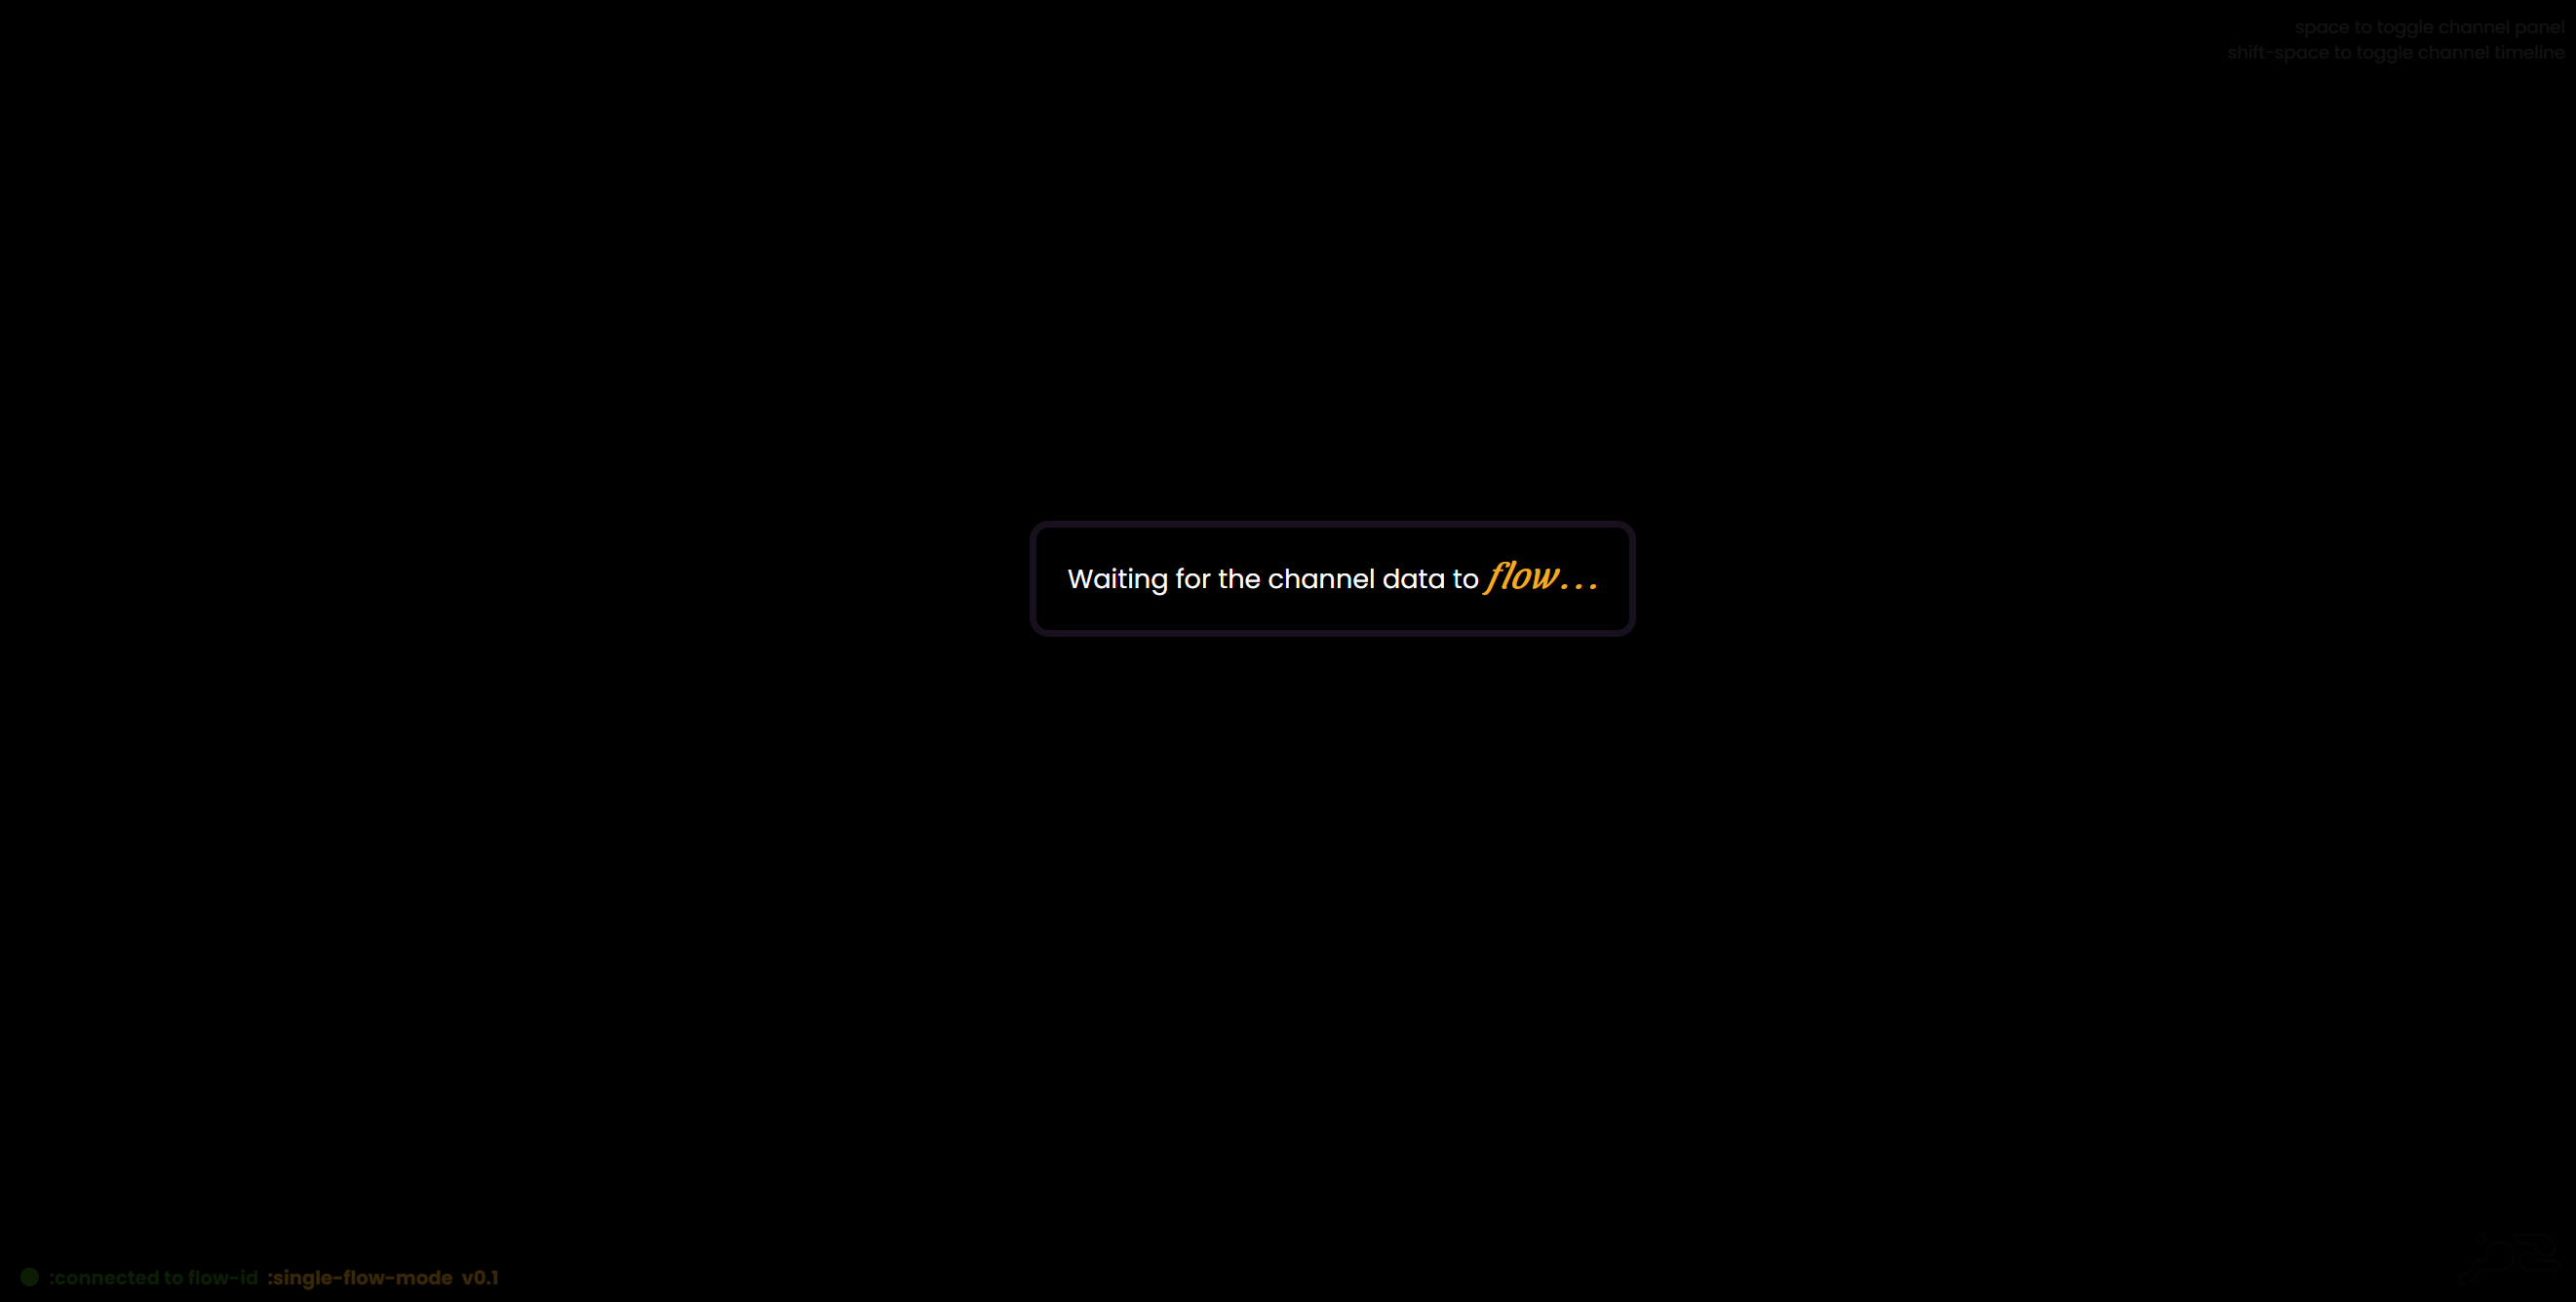 When the web ui is first booted up via...
(fweb/start!) ;; flowmaps.web/start! or stop!
;; returns:
[:*web "starting web ui @ http://localhost:8888" "🐇"]
...you will see a blank canvas that won't show anything until a flow is run. Obviously this data is not pushed out unless rabbit is running in your REPL or application.
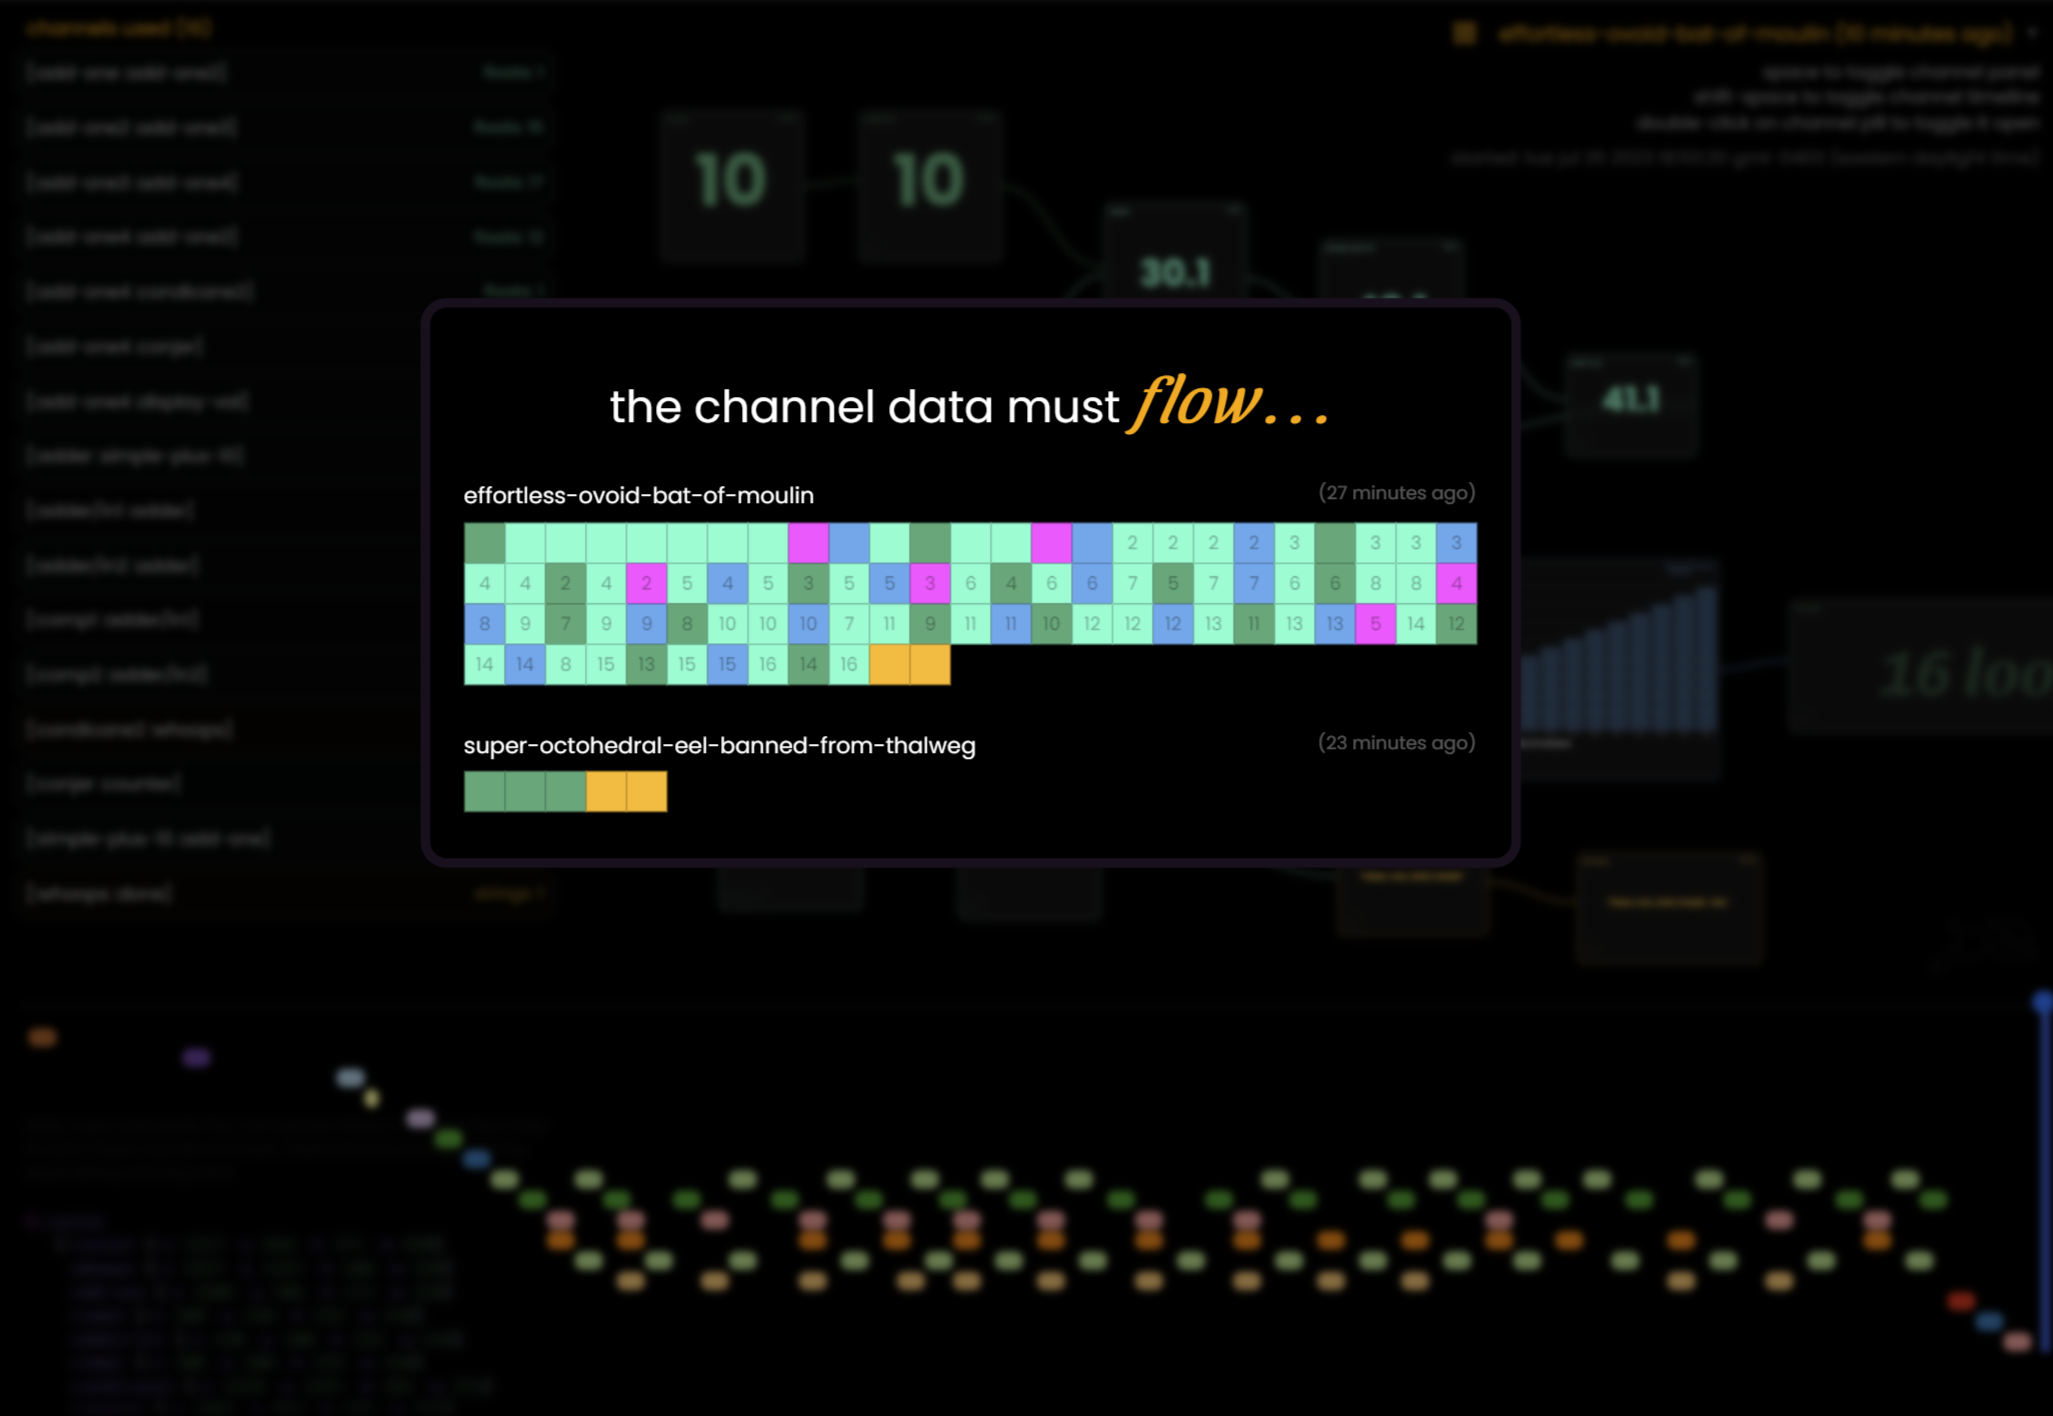
Once some data starts coming in, you will see a small waffle chart of each flow that has run/is running in your repl/application! Click on a flow-id (randomly generated, or hardcoded with opts :flow-id "whatever") to select it, and click on the canvas to dismiss this "flow start" screen.
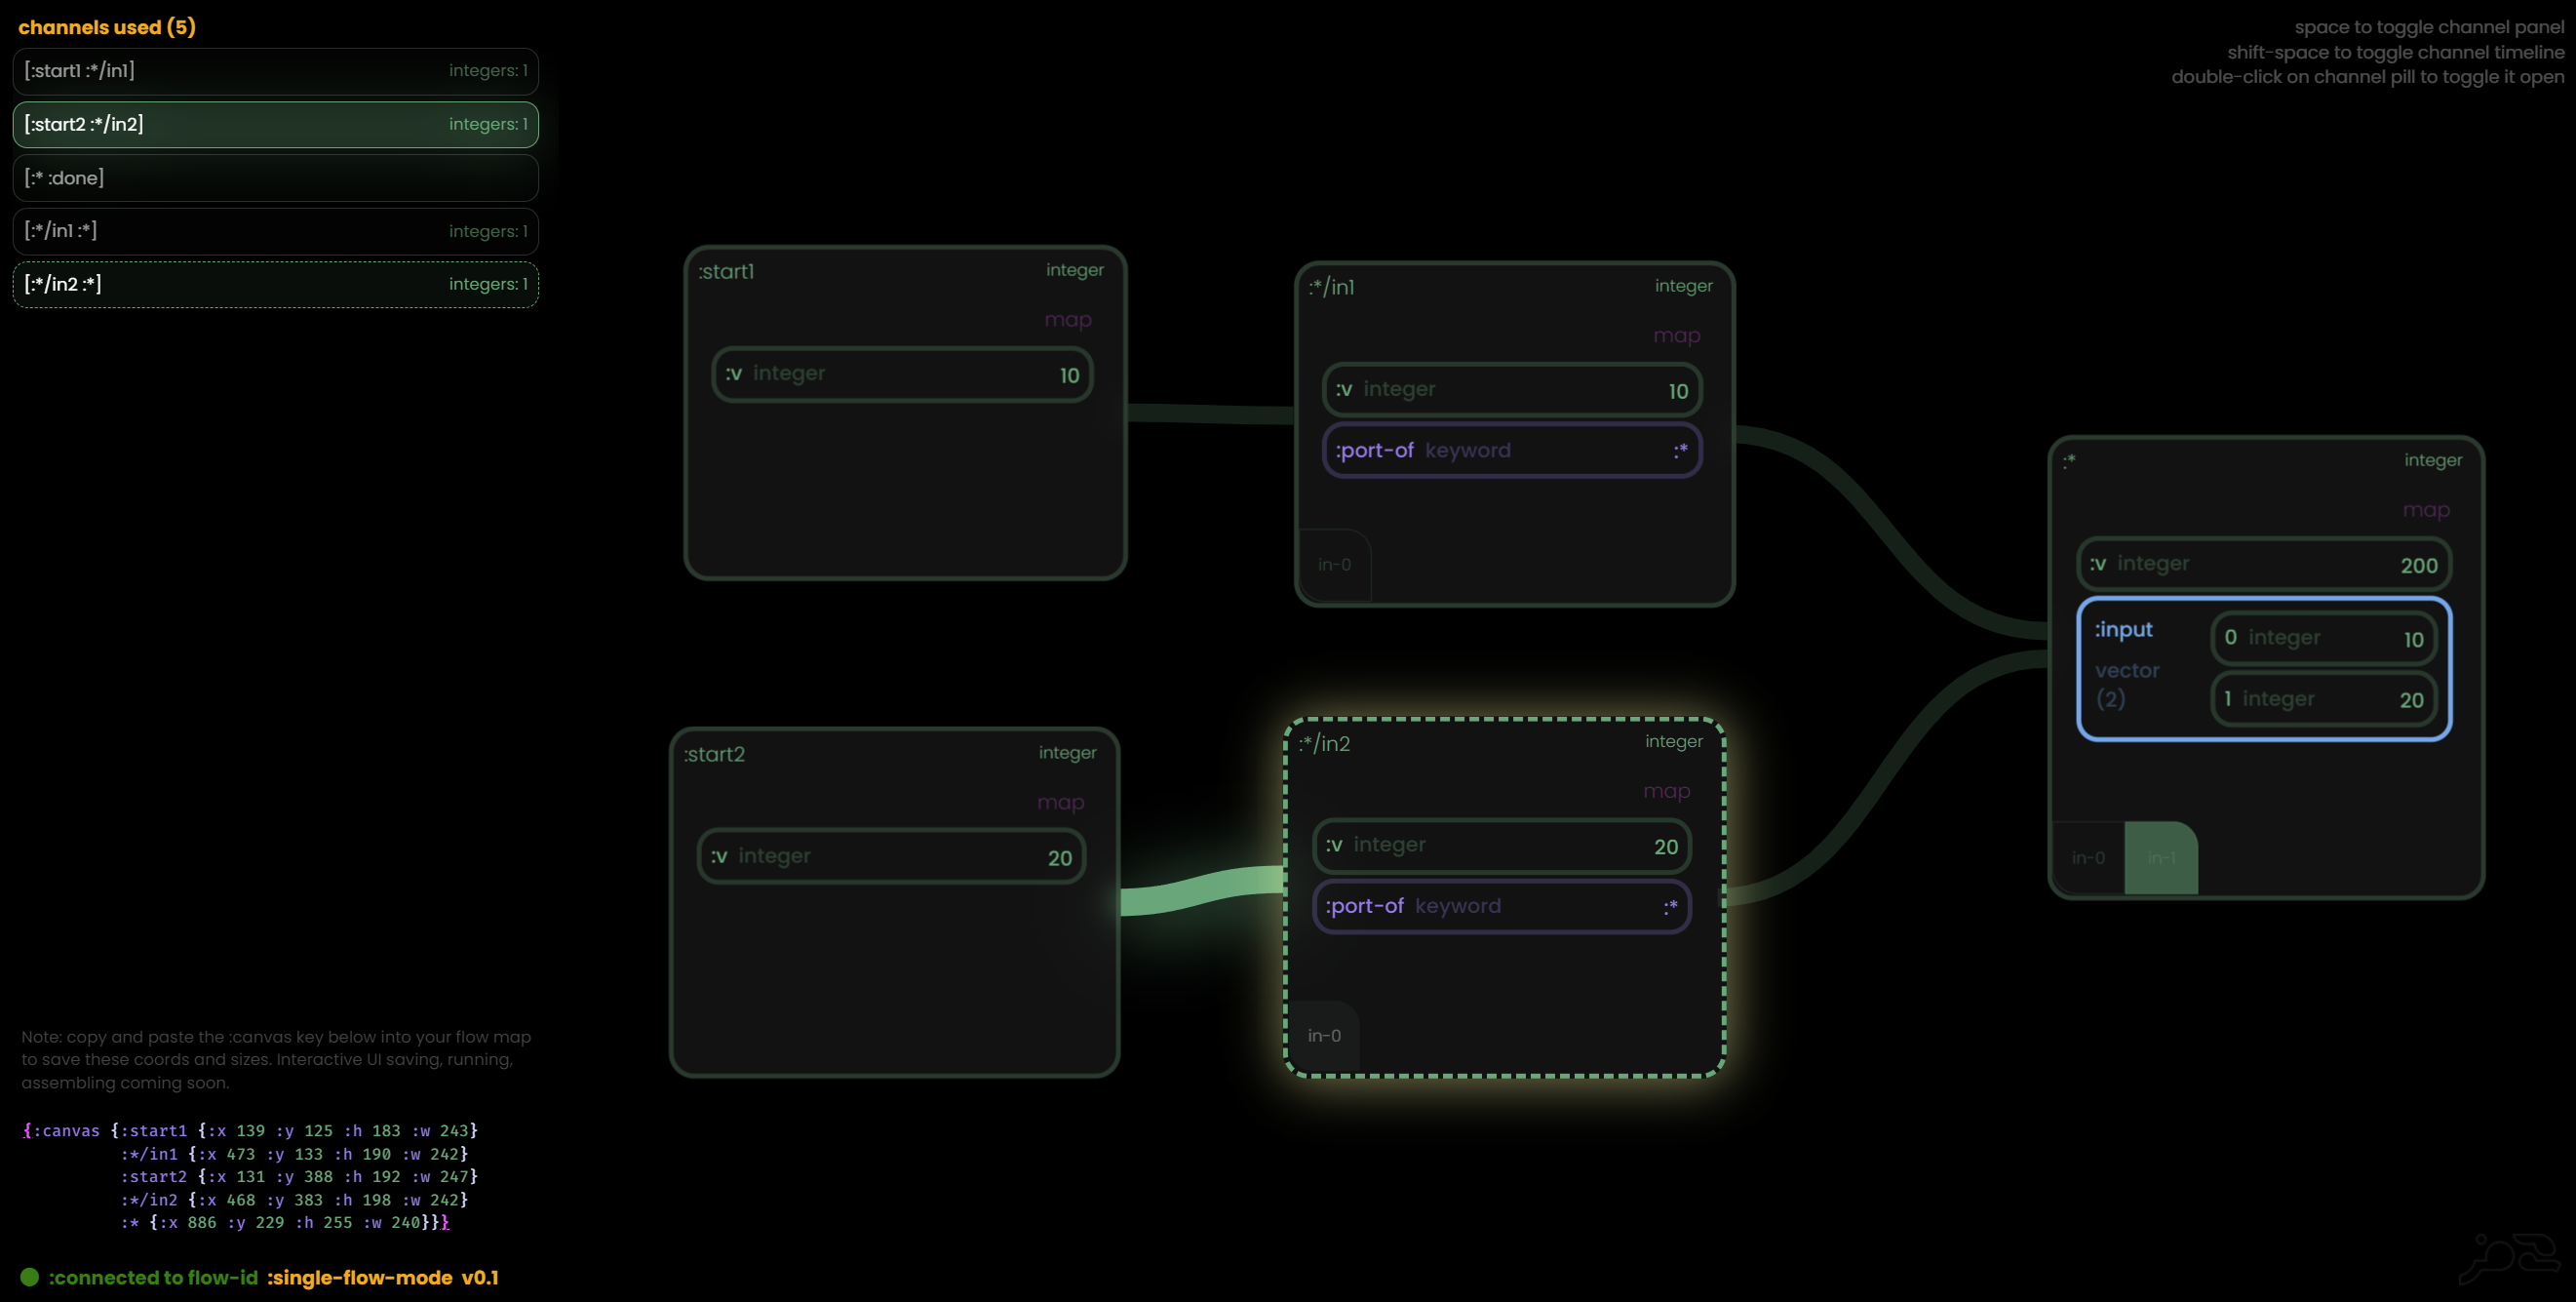
Hit the spacebar to toggle the channel sidebar panel.
This left-side panel lists all the active channels. Each line between blocks is a channel. Hovering over a block or a channel will highlight that in the other - as well as directly upstream channels and blocks.
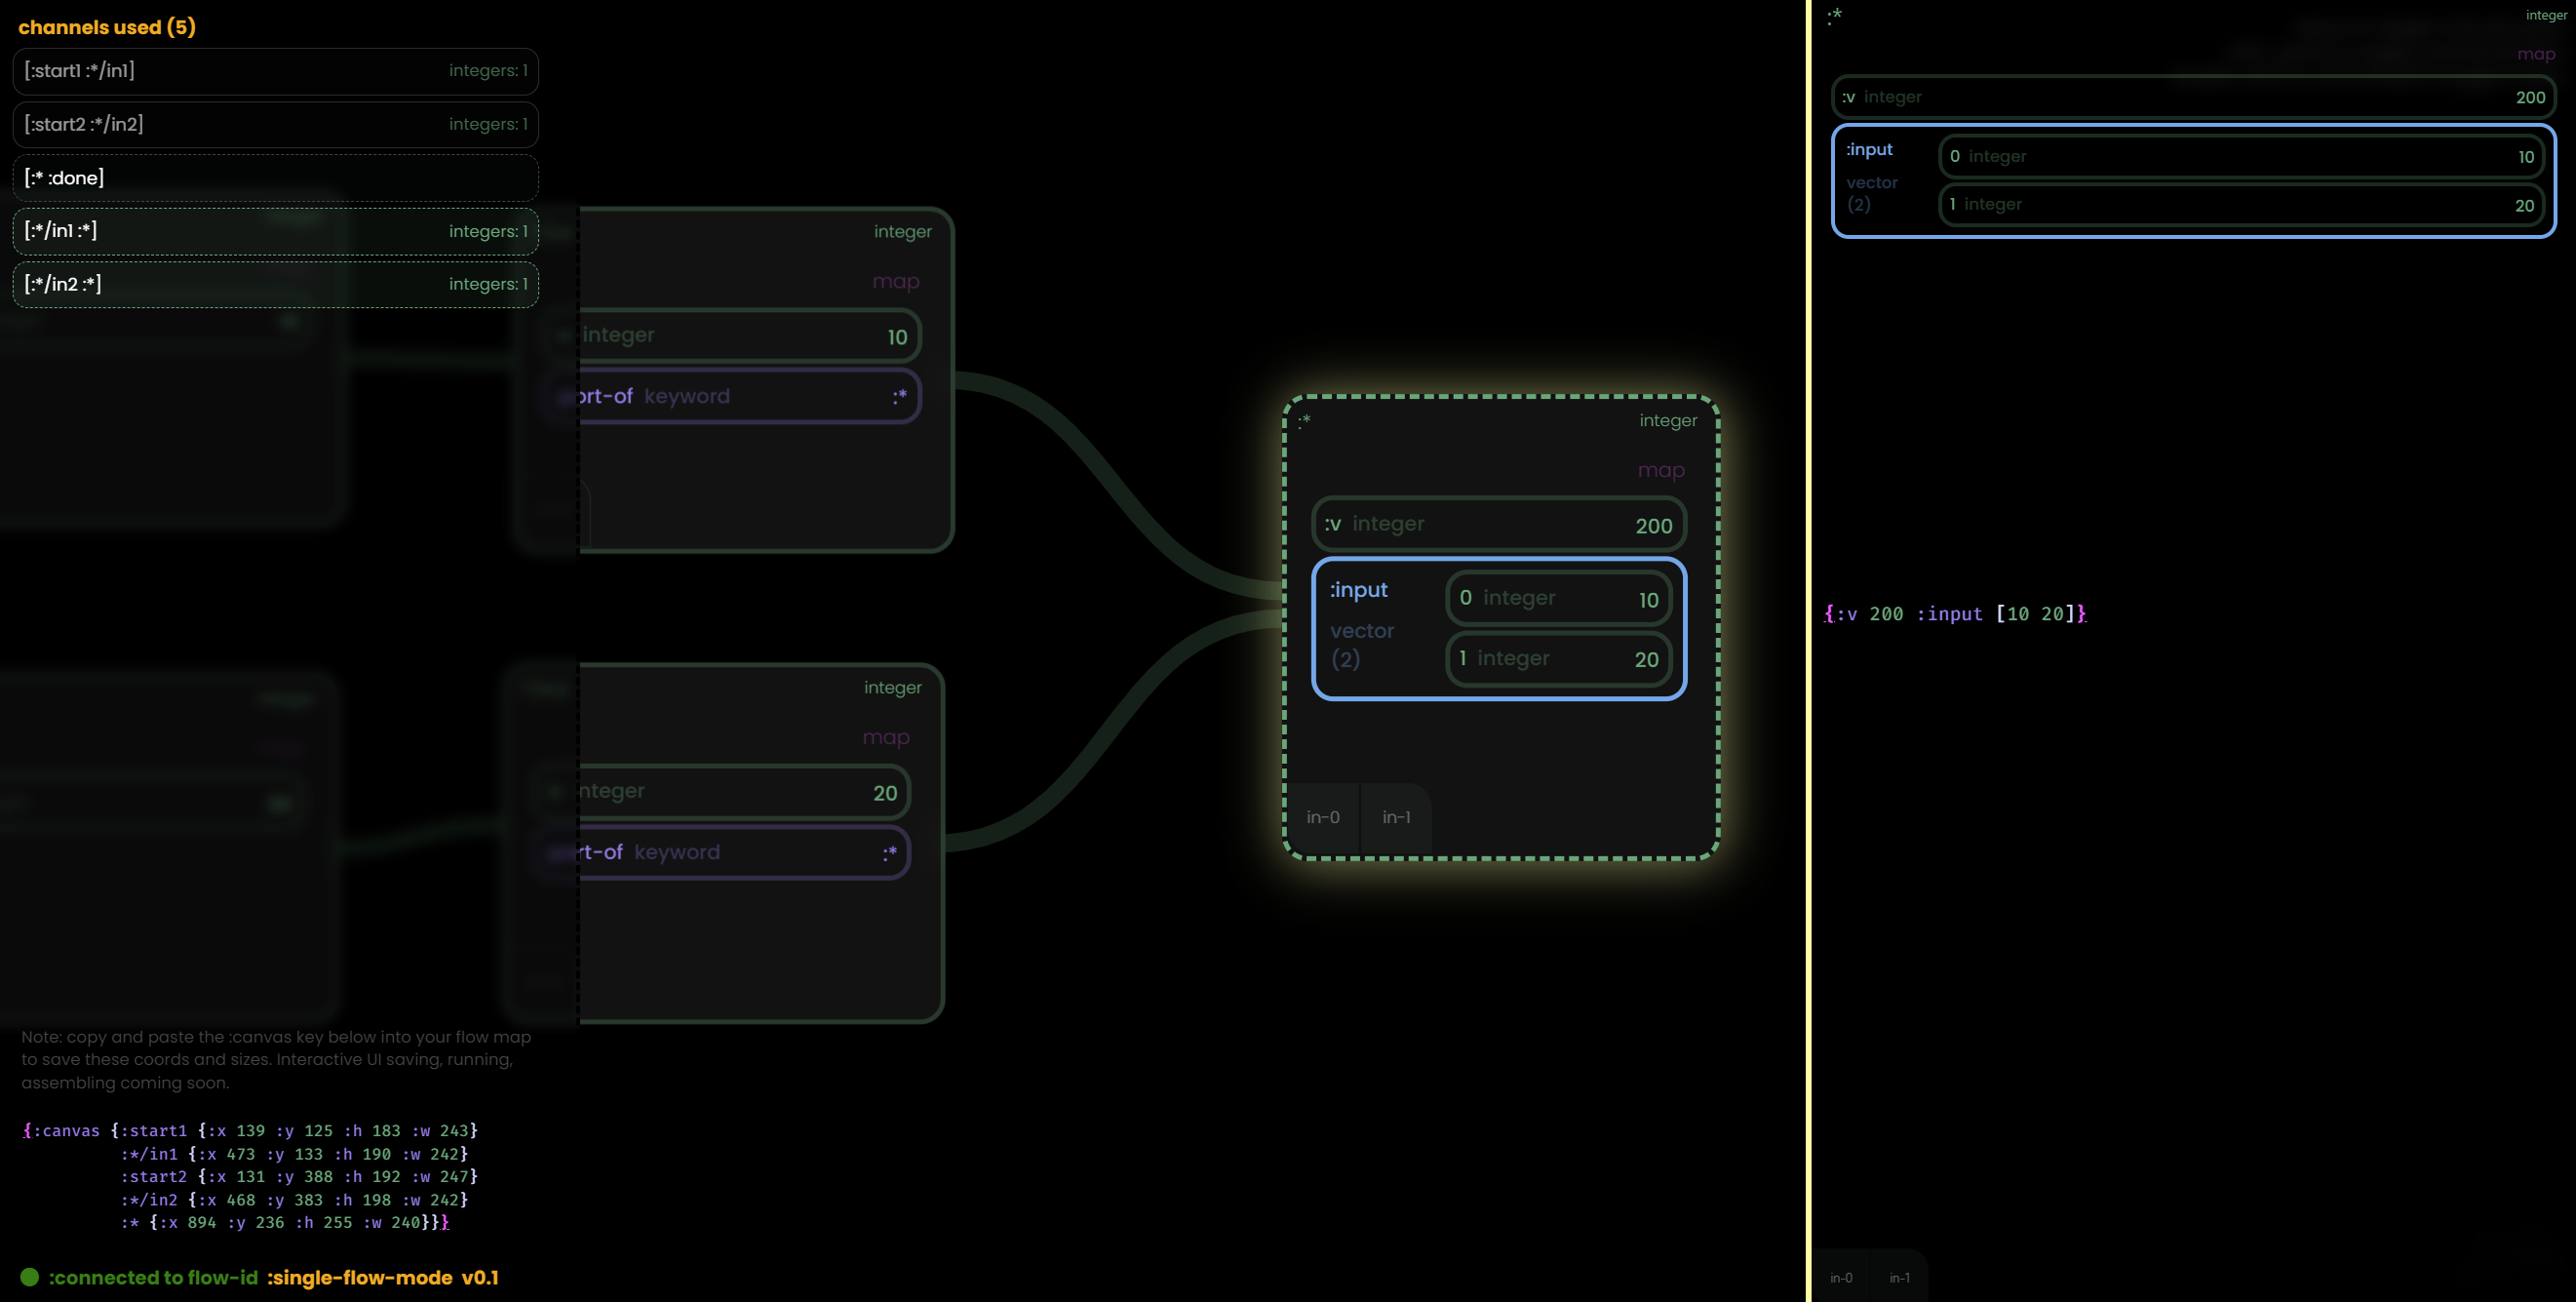
Value explorer - double-clicking on a block's titlebar will open up a side panel on the right and show the values or views associated with that block. Click anywhere on the canvas to dismiss.
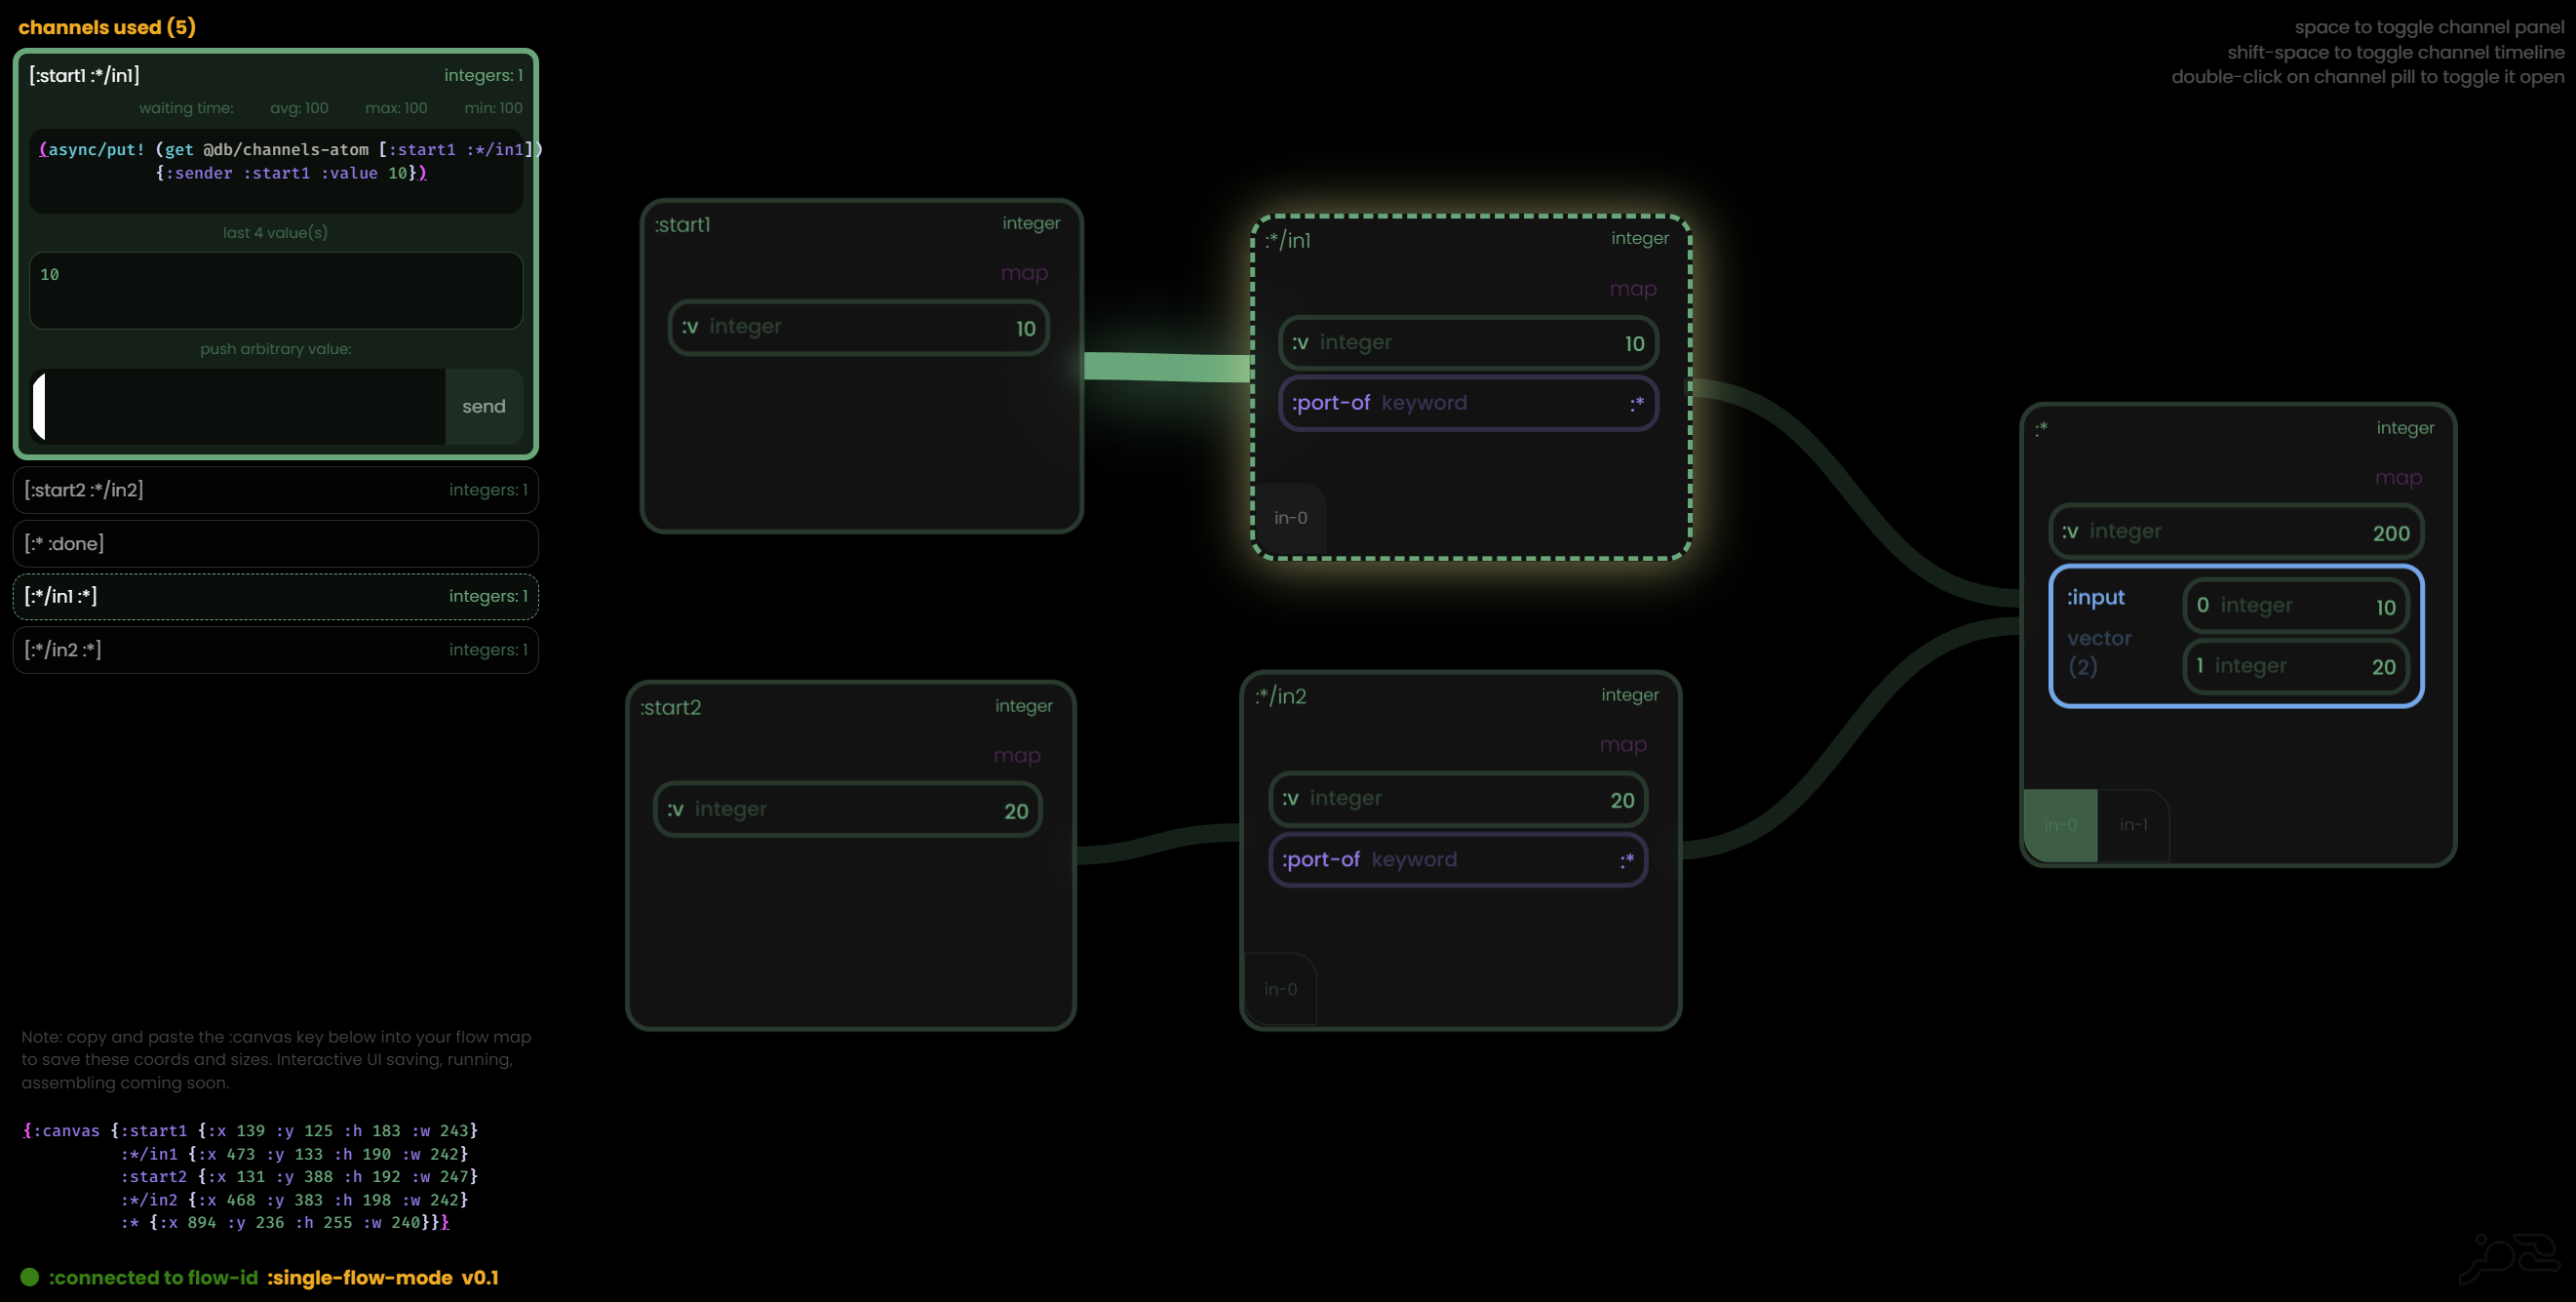
Right clicking on the channel pill on the left sidebar to expand it. It will contain:
- a REPL command to push a value to that channel (copy-pasta all the way!)
- a set of the last 4 values that channel has "seen" (click on one of them to RESEND that value to the channel)
- a text box to send an arbitrary value to this channel
This is a great way to interact with the flow once it's been booted up. The channels are all still open and "running" so placing values upstream allows you to "watch" them flow back down through the system.
Basic term reference
- flow-map
- The flow-map a literal Clojure map that contains all the info needed to bootstrap up a flow (or core.async chain). There are only 2 required keys.
- :components - a reference mapping of a literal clojure function to a keyword "block" name. Can just be a static value (which just gets passed), a single fn alone, or a map with a :fn key and various values - see more advanced options in the examples.
- :connections - a simple vector of 1:1 connections between blocks. Each of these will become a dedicated channel (and often more channels will be automatically created to due to implied connections)
{:components {:static-val1 10
              :plus-10 #(+ 10 %)}
 :connections [[:static-val :plus-10]]}
 ;; should create one channel and return 20 via output channel/atom if provided
- The flow-map a literal Clojure map that contains all the info needed to bootstrap up a flow (or core.async chain). There are only 2 required keys.
- flow-runner
- the flowmaps.core/flow function that bootstraps the channels, seeds their values, and begins execution. Called "flow runner" or "runner". Can optionally return the "final" values via a channel, atom (or separate reporting fn flowmaps.core/flow-results (see below)).
- blocks
- can be called a component or block function, etc. It's a member of the :components key above and the most basic building block (heh) of a flow. many of my examples use anon function wrappers for this since it makes the definition of where inputs will go, straightforward. More complex examples with multi-arity mappings below. (we are essentially defining the "input" and "output" ports of the block)
- connections / "lines"
- a dedicated channel that provides data / signal from one place to another. In the rabbit-ui each line is in fact a channel - and when pushing arbitrary values around (via the left-side channel panel) you are putting the value "on the line" as opposed to "in a block", which is an important distinction in large more complex flows
- views
- and optional key inside a block mapping that contains a server-side function that produces a hiccup, re-com, vega, vega-lite data structure that the front-end will understand (see examples below). This function will be passed a single value - which is the return value of that block - meaning that the view is processed after the block function. Note: If the rabbit-ui isn't running, this :view does nothing.
- rabbit
- The optional canvas based UI. I have a history of flow-based canvas UIs - they all revolve around this grand "Data Rabbit" concept I have been working on for years. Projects like this are a opportunity to apply those concepts to niche areas. Anytime I mention "rabbit", "rabbit-ui", "the debugger", "the visualizer"- this is what I am referring to.
- canvas
- The rabbit canvas where the flow is laid out upon. :canvas is also an optional flow map key - see below for examples that contains the :x :y coordinates of the block in "rabbit space", but also the height and width of that block via :h :w. Again, if running headlessly in production - these values are ignored.
- path / track
- Sometimes used to refer to a set of blocks and channels together. i.e. "branching path", "looping path". A track can also be a segment of the flow that is unconnected to the larger flow and runs it's blocks independently.
- sub-flow
- an entire flow that gets executed as a block (not implemented yet! but important to understand, conceptually)
More documentation WIP
TODO / ideas (as of 7/17/23, in no particular order)
- ~~spec for flow-map data sent to the flow fn with useful errors~~
- ~~:flow-id for each run to allow concurrent flows w/o clashing (will also fix a closing channel bug)~~ ~~- rabbit-ui will need to allow the user to choose which "loaded / running flow" to render and interact with (see "sub-flows" below)~~
- :cljs-view option for ClojureScript views that get compiled on the front-end instead of the back end. Opens up some more interactivity options for view blocks.
- subflows! essentially a block that is an entire other flow with some "input overrides" that flow in from the "parent flow". Almost like a visual function that can be examined using the rabbit-ui as it's own flow. (sub)flow-maps as blocks opens up a really interesting world of re-usability...
- flowmaps.io as an open "library" of blocks, flow, function snippets to add to your flows or play around with (actual way it will work TBD)
- this will allow me to focus this repo on the core backend library instead of shoehorning all kinds of rando stuff in there that most people won't use, although I'm def not against the creation of "core primitive" block types for a basic set of CLJ fns shorthand that ships out of the box (perhaps even going as far as packaging SQL, JDBC, etc). TBD!
- some simple examples
- "Philips Hue block" to change your lights - read their statuses
- OpenAI chat block - simplify the API call as much as possible
- etc
- meta :connection pathways for errors. i.e. each block will have an implicit error output port :block-name/error that can be handled in the flow user-space instead of killing the flow chain (as it does currently)
- fix bugs! remove weirdness! (please open issues with example flows to repro when you find them)
- some shortcuts for (not) using :done blocks (optional implied done, instead of explicitly linked)
- rabbit-ui "block assembly".
- The ability to (given a set of starting block defs) use the UI to drag in blocks, connect them, alter their values, test the block functions (disconnectedly with arbitrary values if need be), and then copy-pasta that finished flow-map back to your application
- *I say copy-pasta back because that way YOU are in control instead of me having some other system of persisted DB data that you need to contend with. Some optional feature like that may exist in the future (persistent flow-db w time-travel, etc), but the simple way, I think, is always just giving you the flow "source" to re-use as you see fit.
- The ability to (given a set of starting block defs) use the UI to drag in blocks, connect them, alter their values, test the block functions (disconnectedly with arbitrary values if need be), and then copy-pasta that finished flow-map back to your application
- rendering multi "input ports" differently? Currently rabbit shows them as their own blocks being ingested - which is the easiest way to view and understand them, but conceptually they are just child nodes of the parent block and not their own entities... TBD
- (optional) built-in visualization of block fn spyscope execution data? TBD
- better ergonomics of the flow-map itself, just things that make it less verbose and slightly more flexible - reduce complexity, etc.
- instead of having a static block defined as :my-input 15 - and then having a connection of [:my-input :my-fn-starts] why not just have a connection of [15 :my-fn-starts] and let the system create the implied :static-value-1 block with a 15 in it...
- ~~render rowsets (vectors/lists of uniform maps) in a nice virtual table / grid component instead of nested map blocks in the UI~~
- ~~better visualization of "tracks" - i.e. natural pathfinding of connected blocks~~
- a better pathfinding / coord generating layout algo. When Rabbit loads up a flow without any :canvas metadata it will attempt to lay the blocks out so they don't overlap and are somewhat grokable - but it is FAR from the ideal left->right spaced out layout that we want.
License
Copyright © 2023 Ryan Robitaille (ryan.robitaille@gmail.com @ryrobes)
This program and the accompanying materials are made available under the terms of the Eclipse Public License 2.0 which is available at http://www.eclipse.org/legal/epl-2.0.
This Source Code may also be made available under the following Secondary Licenses when the conditions for such availability set forth in the Eclipse Public License, v. 2.0 are satisfied: GNU General Public License as published by the Free Software Foundation, either version 2 of the License, or (at your option) any later version, with the GNU Classpath Exception which is available at https://www.gnu.org/software/classpath/license.html.
Can you improve this documentation?Edit on GitHub
cljdoc builds & hosts documentation for Clojure/Script libraries
| Ctrl+k | Jump to recent docs |
| ← | Move to previous article |
| → | Move to next article |
| Ctrl+/ | Jump to the search field |
