Keycaps for mechanical keyboards
dmote-keycap produces a three-dimensional geometry for a keycap: Either a
featureless maquette for use in easily rendered previews, or a keycap that you
can print and use.

Features
- Support for various types of switches. Details below.
- A “minimal” keycap style that hugs the body of the switch. This style enables keyboard designs more dense than the traditional 1 u (see below), which can have ergonomic advantages. Dust protection is better than a 0.75 u cap that does not extend down the sides of the switch.
- A “maquette” keycap style for previewing keyboard designs.
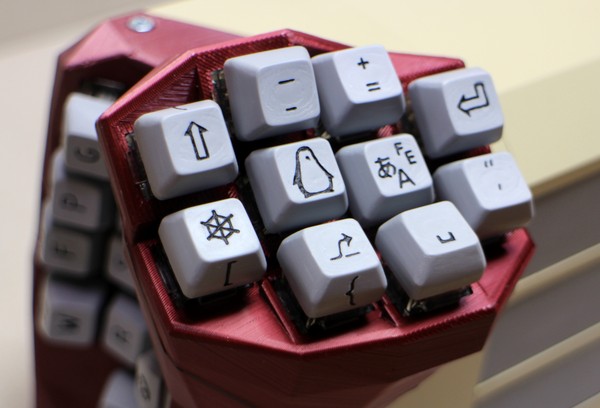
- Legends: Arbitrary 2D designs can be “engraved” into any of the faces of a non-maquette cap: The top and sides, in any combination.
dmote-keycap has no support for stabilizers, raised legends, or multiple
materials (printing to simulate “double shot” injection moulding).
Key size is measured in a traditional unit. 1 u is 19.05 mm (0.75”) per key mount. A 1 u cap is smaller at about 18.25 mm to allow for space between caps on adjacent mounts. For the same reason, a 2 u cap is more than twice as wide as a 1 u cap, and so on.
Usage
This is both a library for scad-clj applications that draw keyboards, and a
CLI utility for drawing printable keycaps that can be used with common
mechanical keyboards.
As a library
The dmote-keycap.data namespace exposes various raw data.
The dmote-keycap.measure namespace exposes functions for calculating
how much space a keycap model would need. Useful in keyboard design.
The dmote-keycap.models namespace exposes one function: keycap. It takes
a number of parameters and returns a scad-clj specification:
:style: One of:minimalor:maquette(see above).:switch-type: See below.:unit-size: A 2-tuple of horizontal size measured in u, hence non-linear. On a traditional ISO keyboard, the first value in this tuple (the width) varies from 1 for most keys to about 6 for a space bar. The second value (the depth) is 2 for the Enter key and 1 for all other keys. Please note that a non-rectangular shape, as is typical for the Enter key, is not yet supported by this library.:top-size: A 3-tuple describing the finger contact surface, including its thickness in the middle, directly above the stem of the keycap. The first two numbers in this 3-tuple can be omitted by replacing them withnil, in which case:slope(see below) will take precedence. All measurements in mm.:slope: A ratio between the top and bottom widths of the keycap. This setting is used to compute top size if:top-sizeis left incomplete, and to position legends on the sides of the cap.:top-rotation: A 3-tuple describing the angle of the finger contact surface, in radians. This would be[0 0 0]for a (row 3 or standard) DSA profile and would have a different non-zero first value for each row of an OEM profile.:bowl-radii: A 3-tuple describing the radii in mm of a spheroid used as negative space to carve a bowl out of the top of a non-maquette keycap. If this option is set tonil(CLI:'nil nil nil'), the top is left flat.:bowl-plate-offset: An optional modification of the vertical distance in mm between the bowl and the top of the keycap.:skirt-thickness: The horizontal thickness of material in the outer walls of aminimalcap.:skirt-length: The length of material from the top of the stem down toward the switch mounting plate. By default, on aminimalcap, this is 1 mm less than the space available when the switch is pressed.:legend: Sources of and related parameters for 2D designs. There is a separate section about legends in this document.:sectioned: If true, the model is cut in half for a sectioned view. This is useful in previews and development.:supported: If true, support structures are added underneath the model.:nozzle-width: The width of the printer nozzle that will be used to print the cap. This parameter is only used to build supports, which will have the width of the nozzle because this improves print speed and quality.:horizontal-support-height: The height of support structures added by:supported, where this are not already determined by the parts they support.:error-stem-positive,:error-stem-negative,:error-body-positive: Printer-dependent measurements of error for different parts of the cap. A breaking change is planned for version 1.0.0: All of these error values will default to zero to broaden support for different printing technologies.
Some of these parameters have global default values, while others have default values associated with particular styles, for ease of use. The long-term plan is to model a variety of traditional “families” with just a few parameters.
As a command-line application
Use lein run with command-line arguments corresponding to the parameters
listed above. Not all parameters are supported; try lein run -- --help.
The application will generate files of OpenSCAD code under output/scad
and, optionally, STL files for slicing and 3D printing.
The CLI supports some additional parameter that are not interpreted by the
keycap function inside the library. Here are some highlights:
--batch: An operating mode for multiple keys; more below.--face-size: Rendering resolution.--filename: For your own CLI-based scripting needs.--render: Render results to STL underoutput/stl.--montage: With--render, render to PNG underoutput/png.
The batch mode flag takes an EDN file path. Example available below.
Montages include a view of all sides of all keys in a --batch.
Rendering requires OpenSCAD. Montages also require ImageMagick.
Switch types
dmote-keycap does not provide models of electromechanical switches, but it
does contain some data on common types of switches, for shaping keycaps to fit.
The following keywords are recognized for the switch type parameter mentioned
above:
:alps: ALPS-like designs, including Matias.:mx: Cherry MX and designs with very similar upper bodies.
The mx category covers, for example, Gateron’s KS-3 series and some of
Kailh’s PG1511 series among other MX clones. However, the PG1511 series
includes some models with shorter travel, and some types of stems (e.g. BOX)
that will not fit with dmote-keycap.
Minor differences in the lower body of two types of switches, such as plate mount versus PCB mount, and lateral recesses on some MX-like switches but not on others, are not modelled by this library because they are irrelevant to keycaps. Version 0.7.0 of the DMOTE application introduced some support for additional switch types that are relevant to the mounting plate.
Legends
dmote-keycap uses OpenSCAD’s import function, not the text function, to
put markings on caps. This enables a wide variety of markings: Anything that
can be expressed in SVG, DXF and other 2D image formats OpenSCAD can import.
To select a legend, when calling into the library, supply a map like this as
part of the options to keycap:
{:legend {:faces {:top {:char "F1"}}}}
The corresponding CLI parameter is --legend-top-char F1.
In this example, :char supplies a text sequence for the F1 key, not a file
path. You can use any text you like but formatting for such sequences is
rudimentary in the current version of dmote-keycap and is likely to change
in future versions.
You will get more power by replacing the :char keyword with
one of :importable, for a file OpenSCAD can read directly, or
:unimportable, for an SVG file that must be simplified before OpenSCAD can
read it.
dmote-keycap uses Inkscape programmatically to
simplify SVG, so you will need that installed for both :char and
:unimportable. If you are calling keycap from an application that does
not use scad-app’s default output structure, you will also need to supply
a function as a the top-level :importable-filepath-fn parameter. This
function must take a string filename and return a path for placing the file
where OpenSCAD will be able to import it.
Placement
The :top keyword in the example above targets the top face, where the user’s
finger touches the key. Other faces can be addressed with :north, :east
and so on.
When importing from SVG for the top face, dmote-keycap will match coordinates
[0, 0] in the image to [0, 0] in OpenSCAD’s coordinate system, which is the
middle of the face.
Targeting is a bit more complicated for the sides:
After being extruded to three dimensions, each image used to mark a side of
the key is tilted using the :slope parameter and moved so that SVG’s [0, 0]
ends up at the height of the top of the stem.
Batch mode format
Batch mode allows for rendering arbitrarily large sets of keys with arbitrary shared and unique properties. Settings for a batch of keys are to be specified in EDN format, a data serialization format chosen partly because, unlike e.g. YAML, it allows maps as map keys. Overrides can be passed on the command line.
The EDN file for a batch must contain a vector of maps, keyed by maps of properties, with vectors of individual switches as their values. Each individual switch must be represented either by a map of properties or by a shorthand format interpreted according to the parent map.
Valid examples of the expected format are available under config. Here is a
usage example calling one of those without any further customization
through the CLI:
lein run -- --batch config/concertina/64key/alps/colemak.edn --render
OpenSCAD and Inkscape are required to run this example.
For large batches with complex legends, add --montage for an easier means of
inspecting the typesetting, using ImageMagick.
Printing
Several of the parameters listed above are intended to aid manufacturability.
This includes the supported parameter, which is intended to reduce the need
for building supports in slicing software.
With single-head FDM printing in a material like PLA, a relatively simple way
to get a good result is to print each key in an upright position, with
supported. In general, a minimal-style cap with a tall top plate (hence
a vaulted ceiling) should need no further support and no brim.
Consider the main alternative: Printing each key upside down. This will often
give you a cleaner stem and skirt, but if the face of the key is not even (i.e.
bowl-radii is not nil), cleaning up the print will be more difficult. In
particular, even with fairly dense supports added by a slicer, you will
probably find tiny cavities behind the face, to such a depth that a really good
surface finish is hard to achieve even with a suitable rotary tool. Still, if
you intend to paint your prints anyway, or if you have a dual-head printer with
a soluble support material, printing upside down may ultimately be a better
option.
Troubleshooting
Recommended solutions to common problems.
When the printed stem is too thick for the stem of the switch
First, for FDM printing, try reducing extrusion width in your slicer. In PrusaSlicer v2.3.0, for example, go into “Print settings” → “Advanced” → “Extrusion width” and reduce e.g. “Perimeters” to a value closer to, but not smaller than, the actual width of your nozzle. By default, slicers for FDM tend to overextrude filament to reduce gaps and compensate for thermal contraction.
For SLA printing, the main factor seems to be orientation. Try rotating the cap and adding supports in your slicer to drain excess resin away from the tip of the stem on the cap.
If that does not work, try running dmote-keycap with error compensation.
- For an
:alpsstem that is too thick, run with--error-stem-positive 0.1or more. - For an
:mxstem that does not fit over the cross of the stem, run with--error-stem-negative -0.1or less.
When the printed cap is too narrow for the body of the switch
First, see the advice on extrusion width and orientation above. If that does
not help, try running with --error-body-positive -0.7 and extra
--skirt-thickness (e.g. 2.5) to compensate for the walls getting thinner
with error compensation. Notice that extra skirt thickness can cause very
tightly placed neighbouring keys to collide.
When the printer nozzle dislocates the stem while printing
First, use standard techniques for print bed adhesion with your printer and filament. For FDM this means e.g. tape, glue stick, alcohol, bed heating, precise z-offset tuning, extra first-layer height and extrusion width etc.
If that does not help, and/or if the caps you are printing do not have the
skirt and stem going to the exact same level, run with --supported.
If that still does not solve the problem, try nozzle lifting in your slicer. In PrusaSlicer v2.3.0, for example, go into “Printer settings” → “Extruder 1” → “Retraction” and set “Lift Z” to a positive value so that the printer lifts before moving between stem and body, reducing shear. If the setting is at zero, try 0.3 mm.
If you’re still seeing the occasional bent stem, run with
--horizontal-support-height 2 or more. This makes taller buttresses that
stabilize the stem by connecting it more strongly to the skirt. You will need
to snip these off with flush cutters, which gets harder the more you increase
the value.
When legends are hard to read
Nozzle size in FDM printing is a fundamental limitation to horizontal resolution. You can work around this a little bit by tweaking slicer settings. In particular:
- Use ironing to smooth out each layer of the top face before adding the next.
- Use variable layer height. Reduce the very top layers to the minimum your hardware can handle.
- Extrusion width and retraction; see above.
When you know what you can achieve this way, design your legends for your hardware. Make your figures thick enough that they survive slicing and printing with the amount of manual cleanup you want to do.
License
Copyright © 2019–2021 Viktor Eikman
This software is distributed under the Eclipse Public License (EPL) v2.0 or any later version thereof. This software may also be made available under the GNU General Public License (GPL), v3.0 or any later version thereof, as a secondary license hereby granted under the terms of the EPL.
Can you improve this documentation?Edit on GitHub
cljdoc is a website building & hosting documentation for Clojure/Script libraries
× close